Understanding Wildfire Defensible Space: Your Home's First Line of Defense
Picture this: You're watching the evening news, and a wildfire is burning twenty miles from your neighborhood. The smoke is visible on the horizon, and your phone keeps buzzing with emergency alerts. Your neighbors are nervously checking their phones, some already packing bags. You look at your home—the pine needles piled against the foundation, the juniper bushes touching your siding, the firewood stacked against the garage wall. A knot forms in your stomach as you realize you're not prepared.
This scenario plays out thousands of times each year across fire-prone regions. The good news? It doesn't have to end in disaster. The concept of defensible space offers homeowners a practical tool to protect their property and give firefighters a real chance to save your home when wildfires threaten.
Defensible space is a buffer zone around your home where vegetation and other combustible materials are strategically managed to reduce fire intensity and slow its spread. Think of it as creating breathing room between your house and the wildland fuels that feed wildfires. According to FEMA, properly maintained defensible space can significantly increase your home's chance of surviving a wildfire, even when firefighters can't be there to defend it .
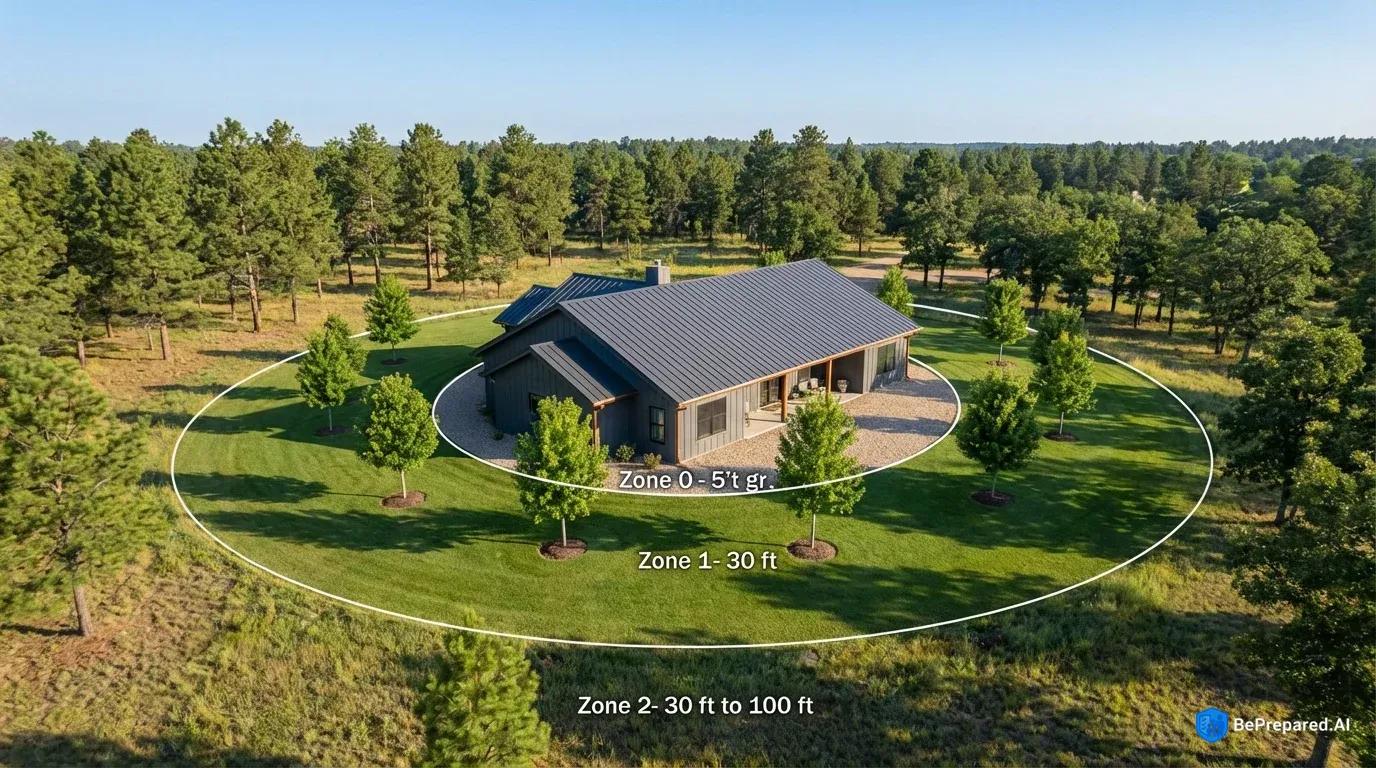
The defensible space concept divides the area around your home into three distinct zones. Each zone has specific requirements and maintenance needs. California law requires homeowners to maintain 100 feet of defensible space around their structures, and many other states have adopted similar regulations . This isn't just about following the law—it's about understanding how fire behaves and using that knowledge to create layers of protection.
Zone 0 extends from your home to five feet out, forming your most critical barrier . Zone 1 reaches from five to thirty feet, where careful vegetation management becomes essential . Zone 2 extends from thirty to one hundred feet (or to your property line), where strategic thinning creates fuel breaks . Together, these zones work like concentric shields. Each one reduces fire intensity and buys precious time. The beauty of this system is that it's entirely achievable for most homeowners—you don't need special equipment or expertise, just knowledge and commitment to regular maintenance.
Let's break down each zone into simple, manageable steps you can start today.
Zone 0: The Immediate 5-Foot Perimeter (Most Critical)
Start by walking completely around your home, staying within that critical five-foot perimeter. What you're looking for might surprise you—it's not just obvious fire hazards but anything that can burn. Zone 0 should be completely free of combustible materials, creating what fire professionals call a noncombustible zone . This is your home's last stand against approaching flames.
Begin at your foundation and work outward. Remove all dead leaves, pine needles, and plant debris. That decorative bark mulch touching your siding? It needs to go. The wooden planter boxes against the wall? Move them beyond five feet or replace them with metal or concrete alternatives. Firewood stacks, propane tanks, and even those cardboard boxes you've been meaning to recycle—everything combustible must be relocated outside this zone.
Pay special attention to areas where debris accumulates naturally. Gutters and roof valleys filled with dry leaves act like kindling trays, ready to ignite from floating embers. Clean them thoroughly and consider installing gutter guards to prevent future buildup. Check under decks and porches—these enclosed spaces often become collection points for wind-blown leaves and needles. Clear them completely and consider enclosing the undersides with wire mesh to prevent debris accumulation.
Now focus on ground cover. Using rock, gravel, or pavers in Zone 0 can create an effective fire barrier that also looks attractive . A layer of decorative gravel provides good protection while requiring virtually no maintenance. If you prefer some greenery, choose low-growing, high-moisture succulents planted in small islands surrounded by rock. Think ice plant, sedum, or jade plants—species that hold significant water content in their leaves.
The hardscaping options for Zone 0 extend beyond simple gravel. Concrete pavers, flagstone pathways, and brick borders all serve double duty as attractive landscaping elements and fire barriers. A stone patio directly adjacent to your home creates both outdoor living space and excellent fire protection. These materials won't ignite, won't generate embers, and actually help protect your home's exterior from radiant heat.
Don't forget vertical surfaces. Remove climbing vines from walls, even attractive ones like ivy or jasmine. When fire encounters a vine-covered wall, it essentially has a ladder to climb directly to your roof or eaves. Similarly, check that no tree branches overhang your roof or touch your siding. These create direct pathways for fire to reach your home's most vulnerable areas.
Consider what's attached to your house. Wooden trellises, lattice work, and decorative shutters all add fuel load in Zone 0. If you love these features, look for metal or composite alternatives that provide the same aesthetic without the fire risk. The goal is simple: within five feet of your home, if it can burn, it shouldn't be there.
This might sound overwhelming, but here's the truth: most homeowners can complete their Zone 0 work in a single weekend. Start with one side of your house. Clear it completely. Then move to the next side. Breaking it into smaller tasks makes the project feel manageable rather than impossible.
Zone 1: 5-30 Feet From Buildings
Sarah had always loved the dense cluster of pine trees just outside her bedroom window. They provided shade in summer, privacy year-round, and a beautiful view of greenery. After attending a community wildfire preparation workshop, she realized those trees—planted just six feet apart—created exactly the kind of fuel ladder that could carry fire directly to her home. The decision to thin them wasn't easy, but understanding the "why" made it necessary.
Zone 1 requires a delicate balance. You're not creating a barren moonscape, but rather a carefully managed landscape where plants and trees exist in spacing that prevents fire from easily jumping between them. Fire experts recommend spacing trees in this zone to prevent flames from leaping tree-to-tree. This spacing forces fire to drop back to ground level where it burns with less intensity.
When Sarah began her Zone 1 project, she started by identifying which trees to keep. She chose the healthiest specimens, prioritizing native hardwoods over pines and removing any dead or dying trees entirely. Between the remaining trees, she created clear spacing. This initially looked sparse but gradually filled in as the remaining trees grew fuller without competition. The transformation took a full season, but the result was a more park-like setting that actually enhanced her property's appearance while dramatically reducing fire risk.
Shrub management in Zone 1 follows similar principles. Those dense hedges that provide privacy? They need strategic pruning or replacement with well-spaced individual plants. Create horizontal separation between shrubs—spacing them based on their mature height works as a good rule. A three-foot-tall shrub should have several feet of clearance to the next shrub. This spacing might seem excessive, but remember that fire doesn't just burn vegetation—it preheats nearby fuels through radiant heat, causing them to ignite even before flames arrive.
The concept of vertical spacing matters equally. Remove "ladder fuels"—the low-hanging branches and intermediate vegetation that allow ground fires to climb into tree canopies. Pruning tree branches up from the ground helps prevent fire from climbing into the canopy. Eliminate shrubs growing directly beneath trees. Imagine fire as water flowing uphill; you're removing the stepping stones it would use to climb higher.
Regular maintenance keeps Zone 1 effective. Dead branches, fallen leaves, and seasonal debris accumulation all restore fuel loads you've worked to remove. Sarah now schedules quarterly Zone 1 maintenance sessions. She spends a few hours each season removing debris, pruning new growth, and checking tree spacing as her remaining trees mature. She's discovered that maintaining defensible space requires far less work than creating it initially—consistent attention prevents small problems from becoming overwhelming projects.
The vegetation you choose for Zone 1 matters as much as spacing. Native, drought-resistant plants typically contain less volatile oils than imported ornamentals. Replace highly flammable species like junipers and ornamental grasses with lower-risk options like California lilac, toyon, or manzanita. Well-irrigated plants burn less readily than drought-stressed vegetation, so consider drip irrigation for Zone 1 plantings.
Here's a simple way to think about Zone 1: if you can walk through your yard without ducking under branches or pushing through shrubs, you're probably on the right track. The space should feel open and park-like, not dense and jungle-like.
Zone 2: 30-100 Feet From Buildings
Zone 2 represents the transition between your managed landscape and wildland vegetation. The technical requirements here focus on reducing overall fuel density while maintaining natural aesthetics and erosion control. Proper spacing between shrubs and trees can slow fire spread significantly, giving firefighters time to establish defensive positions and potentially saving your home .
The spacing requirements in Zone 2 vary based on slope—a critical factor many homeowners overlook. Fire travels faster uphill, preheating fuels above it and creating stronger convective drafts. Experts recommend increasing tree spacing on slopes compared to flat ground. On moderate slopes, you'll need greater spacing between trees. Steep slopes require even more spacing between trees. Calculate your slope by dividing the vertical rise by horizontal distance; a twenty-foot rise over one hundred horizontal feet equals 20% slope.
Fuel breaks within Zone 2 create strategic barriers that fragment continuous vegetation. These don't need to be bare earth strips—a gravel driveway, maintained trail, or irrigated lawn all function as effective fuel breaks. The goal is creating discontinuities in vegetation that force fire to lose intensity as it crosses gaps. A maintained path through Zone 2 can dramatically slow fire progression, buying crucial time.
Access considerations become paramount in Zone 2. Firefighters defending your property need clear paths to position equipment and establish water sources. Fire professionals recommend maintaining driveways and access roads wide enough for emergency vehicles with adequate vertical clearance—enough for fire engines to navigate without damage. Remove overhanging branches and encroaching shrubs that narrow passages. Mark your address clearly with reflective numbers visible from both directions; firefighters can't defend a home they can't find through smoke.
Vegetation thinning in Zone 2 follows the principle of creating a mosaic rather than uniform coverage. Cluster trees in small groups separated by open areas rather than maintaining even distribution. This pattern mimics natural fire-resistant landscapes while providing wildlife habitat and visual interest. Remove the smallest and weakest trees within clusters, leaving the most vigorous specimens with adequate spacing.
Ground fuels require attention even in Zone 2. While you're not maintaining the manicured standard of Zone 0, heavy accumulations of fallen branches, pine cones, and leaf litter create continuous fuel beds that carry fire efficiently. Annual raking and removal of excess debris reduces this hazard without requiring intensive ongoing maintenance. Focus particularly on areas where natural drainage concentrates debris or where prevailing winds deposit materials against fences and outbuildings.
The intersection of Zone 2 with neighboring properties presents both challenges and opportunities. Coordinate with neighbors to create continuous defensible space that doesn't end at property lines. Fire doesn't respect boundaries, and your carefully managed Zone 2 provides little protection if your neighbor's overgrown lot sits immediately adjacent. Many communities organize neighborhood workdays where residents collaborate on shared defensible space projects. This creates stronger protection for everyone while building community resilience.
Zone 2 work doesn't have to happen all at once. Many homeowners tackle this zone over the course of a year, working on small sections during weekends. Start with the areas closest to Zone 1 and work outward. Each section you complete adds another layer of protection.
Getting Started: Your First Steps
Feeling overwhelmed? Don't be. You don't need to complete all three zones in a weekend or even a month. Here's how to start small and build momentum.
Week One: Zone 0 Assessment Walk around your home with a notepad. Write down everything within five feet that can burn. Don't fix anything yet—just observe and list. This simple act of awareness is your first victory.
Week Two: Quick Wins Remove the easiest items from your Zone 0 list. Move that firewood stack. Rake those leaves. Clear the gutters. These quick wins build confidence and create immediate protection.
Week Three: Zone 0 Completion Tackle the remaining Zone 0 items. Replace wood mulch with gravel. Move planters. Trim back those vines. By the end of week three, your most critical zone is protected.
Month Two and Beyond: Expand Outward Now move to Zone 1. Start with dead or dying vegetation—it's the highest risk and easiest to justify removing. Then work on spacing. Take it one tree, one shrub at a time.
Download our printable defensible space maintenance checklist to track your progress through all three zones and ensure you're maintaining the protection you've worked hard to create.
Maintaining Your Defensible Space
Creating defensible space is just the beginning. Maintenance keeps it effective. The good news is that maintenance is far easier than the initial creation.
Seasonal Tasks Each spring, walk your zones and remove winter debris. Each fall, clear fallen leaves and needles before they accumulate. These twice-yearly walkthroughs take just a few hours but preserve months of initial work.
Monthly Quick Checks Once a month, do a quick visual scan of Zone 0. Look for new debris accumulation, especially after storms. A fifteen-minute monthly check prevents small problems from becoming big projects.
Annual Deep Maintenance Once a year, usually in early spring, do a thorough assessment of all three zones. Check tree spacing as plants grow. Prune new growth that's encroaching on clearances. Remove dead vegetation. This annual deep dive keeps your defensible space effective year after year.
Coordinate with Neighbors Your defensible space works best when your neighbors maintain theirs too. Share what you've learned. Offer to help elderly neighbors with their Zone 0 work. Organize a neighborhood cleanup day. Community-wide defensible space creates protection that individual efforts can't match.
The Bottom Line
Defensible space isn't about creating an ugly, barren landscape around your home. It's about smart vegetation management that reduces fire risk while maintaining beauty and function. The three-zone system breaks a potentially overwhelming project into manageable pieces.
Start with Zone 0—your most critical five feet. Complete it before moving outward. This approach builds confidence and creates immediate protection. Zone 1 comes next, then Zone 2. Each zone you complete adds another layer of defense.
Remember Sarah and her pine trees? A year after thinning them, she no longer sees a sparse landscape. She sees healthy, vigorous trees with full canopies and good spacing. She sees a yard that's easier to maintain and more enjoyable to use. Most importantly, she sees a home that's protected.
You can create this same protection. The work is straightforward. The benefits are substantial. Your home's survival in a wildfire may depend on the work you do today in creating and maintaining defensible space.
Take that first step. Walk around your home. Look at your Zone 0. Make your list. The journey to a fire-safe home begins with that single step, and every step after that gets easier.