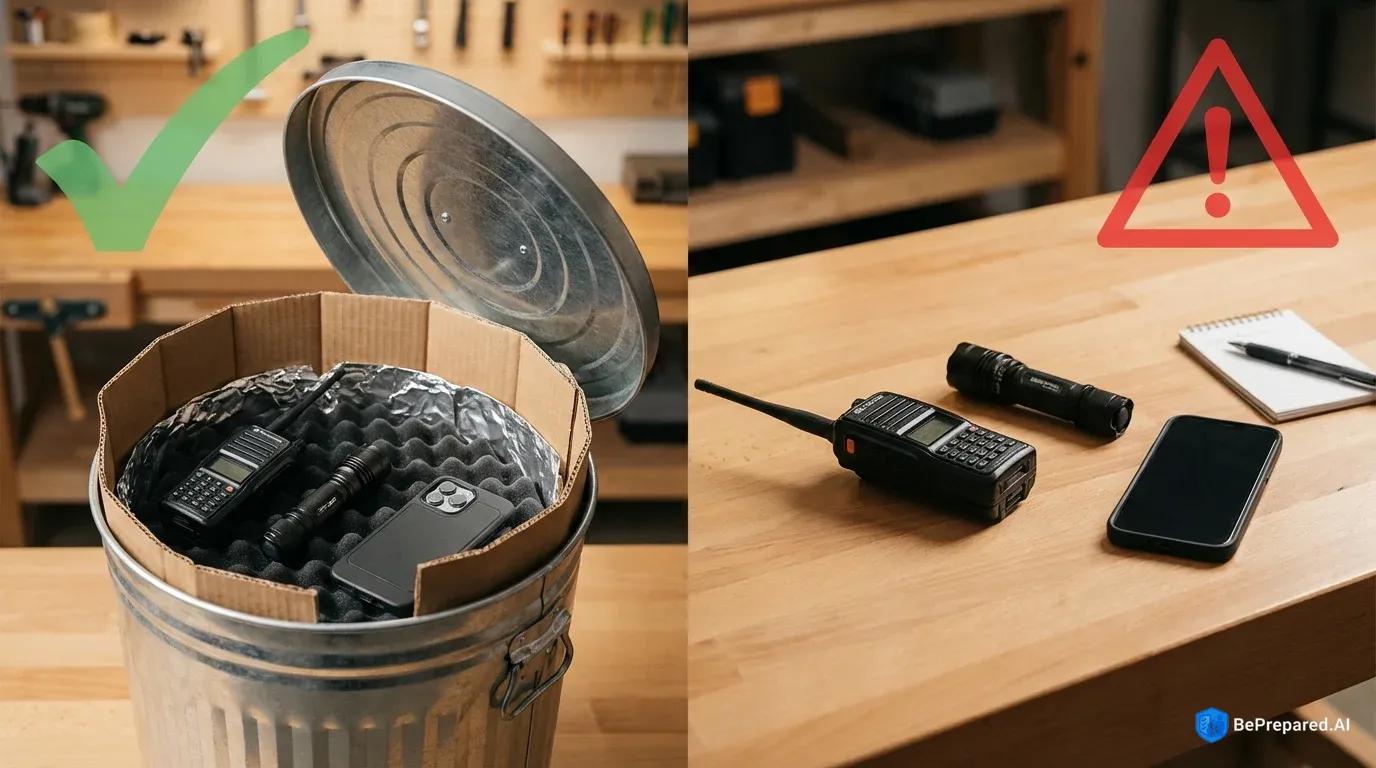
Understanding Faraday Cages: Your Electronic Safety Net
Picture this: You wake up one morning to find your phone dead, your laptop fried, and your car won't start. Not because of dead batteries, but because an electromagnetic pulse swept through your area overnight. It sounds like science fiction, but electromagnetic threats—whether from solar storms, EMP weapons, or other sources—are real concerns that government agencies like FEMA actively prepare for .
So what's a Faraday cage, and why should you care? Think of it as a protective bubble for your electronics. Named after scientist Michael Faraday, who discovered the principle in 1836, a Faraday cage is a metallic enclosure that blocks electromagnetic fields from reaching whatever's inside . The metal creates a shield by conducting electrical charges around the exterior, preventing them from penetrating the interior space. It's like an umbrella for electromagnetic radiation—the metal deflects the energy around your devices rather than letting it pass through.
Many preppers assume you need expensive military-grade equipment to protect your electronics, but that's one of the biggest misconceptions out there. The truth is, you can build an effective Faraday cage using materials from your local hardware store or even items already sitting in your garage. You don't need a degree in electrical engineering or a workshop full of specialized tools. Another common myth is that Faraday cages are all-or-nothing devices. While it's true that complete metallic enclosure is required for effective EMP shielding , you can still build reliable protection without perfection. Even imperfect shields can significantly reduce electromagnetic interference .
The science behind why preppers need Faraday cages is straightforward: modern life depends on electronics, and electromagnetic pulse events can destroy unprotected devices in microseconds. According to the Department of Energy's EMP Resilience Action Plan, a significant electromagnetic event could damage critical infrastructure and personal electronics across vast geographic areas . Having even a few essential devices protected—a radio, flashlight, backup phone, or solar charger—could make the difference between staying informed and being completely isolated during a crisis. You're not preparing for the end of the world; you're simply creating a backup plan for your most important tools.
- Aluminum Foil
- Multiple layers create basic electromagnetic barrier, easily accessible and affordable
- Metal Mesh Screen
- Fine copper or aluminum mesh provides flexible shield while allowing ventilation
- Galvanized Steel Box
- Durable container that forms the main structure of a basic Faraday cage
- Copper Tape
- Conductive adhesive tape for sealing gaps and ensuring continuous shield
- Non-Conductive Liner
- Cardboard or plastic liner prevents stored items from touching cage walls
- Metal Garbage Can
- Ready-made option for larger Faraday cage, just needs proper sealing
Gathering Your Materials
Before you start building, you'll need to collect the right supplies. The good news? You can find everything you need at your local hardware store without breaking the bank. The materials you choose determine your cage's shielding effectiveness, measured in decibels (dB). Research shows that aluminum foil can provide 40-60dB of shielding when properly applied—more than enough for most preparedness scenarios .
Essential Materials:
- Metal container or enclosure: Galvanized steel trash cans with tight-fitting lids work excellently. Alternatively, use aluminum ammo cans, metal filing cabinets, or even steel tool boxes. The container forms the foundation of your protection, so choose something sturdy with a lid that closes firmly.
- Insulating material: Cardboard, foam sheets, or bubble wrap to prevent your electronics from touching the metal directly. This layer is just as important as the metal itself.
- Aluminum foil or copper tape: For sealing gaps and reinforcing weak points. Heavy-duty foil works better than thin foil because it tears less easily.
- Galvanized steel mesh (optional but recommended): Mesh with openings smaller than 1mm provides excellent shielding . This adds an extra layer of protection for your most critical devices.
- Duct tape or metal tape: To secure layers and seal seams. Metal tape maintains better conductivity, but regular duct tape works for securing insulation.
Where to Find Materials:
You can source everything from hardware stores like Home Depot or Lowe's, military surplus stores for ammo cans, or even thrift shops for inexpensive metal containers. The key specification to remember is that any mesh or screening should have holes smaller than the wavelength you're trying to block—for EMP protection, that means gaps under 1mm . Don't overthink this part; a basic galvanized trash can from your local hardware store provides an excellent foundation for your first Faraday cage.
Start simple. Your first cage doesn't need to be perfect or expensive. You're learning a new skill, and like any skill, you'll get better with practice. Many experienced preppers started with a single trash can and a roll of aluminum foil. That's all you really need to begin protecting your electronics today.
Building Your Basic Faraday Cage
Now comes the hands-on work, and this is where attention to detail really matters. The principle is simple, but the execution requires care. Remember, complete metallic enclosure is required for effective EMP shielding . Even small gaps can allow electromagnetic energy to penetrate, potentially damaging your stored electronics. That said, don't let the pursuit of perfection stop you from building good-enough protection right now.
Step One: Prepare Your Container
Start by thoroughly inspecting your metal container. Look for any rust, holes, or damage that might compromise the shield. If you're using a galvanized trash can, check where the lid meets the can—this junction point is critical. The fit should be tight, with metal-to-metal contact all around the rim. If there are gaps, you'll address these later with aluminum foil or copper tape.
Clean the container inside and out. You want good electrical conductivity across all metal surfaces, and dirt or oxidation can interfere with this. A simple wipe-down with a damp cloth followed by complete drying is usually sufficient. This step takes five minutes but makes a real difference in how well your cage performs.
Step Two: Create Your Insulation Layer
This step prevents a critical failure mode that catches many first-time builders: if your electronics touch the metal cage directly, they can short out or the metal can conduct unwanted charges directly into your devices. Proper insulation prevents this shorting while maintaining the cage's protective properties .
Line the entire interior with cardboard, cutting pieces to fit the bottom, sides, and even the lid. Create enough separation between the metal and your devices—several layers of cardboard or thick foam work well. Overlap the cardboard pieces slightly and secure them with regular tape. Some builders prefer foam sheets or bubble wrap, which work equally well. The goal is simply to create a non-conductive barrier between the metal and your electronics.
Don't forget to create an insulated platform for the bottom. Stack several layers of cardboard or use a thick piece of foam. This is especially important because any moisture that accumulates will settle at the bottom, and you want your electronics well above any potential dampness. Think of it like creating a protective nest for your devices—they should be completely surrounded by insulation, not touching metal anywhere.
Step Three: Seal All Gaps and Openings
Here's where many homemade Faraday cages fail: incomplete sealing. Electromagnetic waves can slip through surprisingly small openings. Examine every seam, joint, and connection point. The junction between the lid and container body deserves special attention because that's where gaps most commonly occur.
Wrap aluminum foil around the rim of the container where the lid makes contact. Press it down firmly, ensuring complete coverage with no tears. When you place the lid on, the foil should create metal-to-metal contact all the way around. Some builders add a second layer of foil to the underside of the lid's rim for redundancy, which provides extra insurance against gaps.
If your container has handles, hinges, or other features that create gaps, address each one individually. Small openings can be covered with copper tape or aluminum foil secured with metal tape. The goal is a continuous conductive surface with no interruptions larger than 1mm. Work methodically around the entire container, checking every potential weak point.
Step Four: Add Reinforcement Layers (Optional but Recommended)
For enhanced protection, consider wrapping the entire exterior of your container with aluminum foil. Use heavy-duty foil and overlap each wrap by at least an inch. Secure it with metal tape rather than regular tape—metal tape maintains conductivity while regular tape creates insulating gaps. This exterior layer provides additional shielding and can significantly boost your protection.
Some preppers wrap their cages in multiple layers of foil, creating what's essentially a layered defense system. Each layer adds more shielding. You can start with one layer and add more over time as you gain confidence in your building skills. There's no single "right" number of layers—more is generally better, but even one well-applied layer makes a meaningful difference.
Step Five: Prepare for Storage
Before placing electronics inside, wrap each device individually in plastic bags or anti-static bags. This provides an additional insulation layer and protects against any moisture that might accumulate inside the cage. Include desiccant packets if you're storing the cage in a humid environment—those little silica gel packets that come in shoe boxes work perfectly for this. Label everything clearly so you know what's inside without opening the cage unnecessarily.
Think about what you're storing and why. Your Faraday cage should hold devices you'll actually need during an emergency: a battery-powered radio to receive information, a flashlight, backup batteries, maybe a solar charger or an old phone. Don't just throw random electronics in there. Be strategic about what deserves protection.
Testing Your Faraday Cage
You've built your cage, but does it actually work? Testing is essential because you want to know now—not during an actual emergency—whether your protection is effective. No single test guarantees complete protection against all electromagnetic threats, but several simple methods can indicate whether your cage provides basic functionality .
The Cell Phone Test
This is the easiest and most accessible test. Place your cell phone inside the cage, seal it completely, and then call it from another phone. If your Faraday cage is working, the call shouldn't go through—you should hear a message saying the phone is out of service area or unavailable. Cell phone signal blockage indicates basic functionality and shows that your cage can block radio frequencies .
However, understand this test's limitations. Cell phone signals are relatively low-power compared to an EMP. Just because your cage blocks your phone doesn't guarantee it will withstand a high-altitude nuclear EMP or a massive solar storm. Cell signals are weaker than the electromagnetic threats you're preparing for. Still, if your cage can't block a cell phone signal, it definitely won't protect against stronger electromagnetic threats, so this test serves as a valuable baseline.
Try the test from multiple positions and orientations. Sometimes a cage will block signals when positioned one way but not another, indicating a gap or weak point. If calls still connect, you have a leak somewhere. Systematically check your seals, reinforce gaps with additional foil, and test again. This troubleshooting process teaches you a lot about how electromagnetic shielding actually works.
The AM Radio Test
This test provides additional confirmation. Tune a small AM radio to a strong local station, then place it inside your cage while it's playing. Seal the cage completely. The signal should disappear entirely—you should hear only static. AM radio uses different frequencies than cell phones, so this test validates your cage's effectiveness across a different part of the electromagnetic spectrum.
If you still hear the station faintly, your cage has gaps. The louder the residual signal, the larger the gaps. Again, methodically inspect and seal until the test shows complete signal blockage. Don't get discouraged if your first test fails—this is normal. Each failed test points you toward the specific weakness you need to fix.
Signs Your Cage Needs Adjustment
Beyond formal testing, watch for these indicators that your Faraday cage needs improvement: visible gaps larger than 1mm anywhere in the structure, rust or corrosion on the metal surfaces (which reduces conductivity), loose-fitting lids that don't maintain firm metal-to-metal contact, or torn or damaged foil layers. Any of these issues compromise your shielding effectiveness and deserve attention.
Check your cage periodically, maybe once every few months. Metal can corrode, tape can lose adhesion, and cardboard can absorb moisture. A quick inspection ensures your protection stays reliable over time. Think of it like checking your smoke detector batteries—a small maintenance task that keeps your protection working when you need it.
When to Rebuild
Consider rebuilding or upgrading your Faraday cage if it fails multiple tests even after sealing efforts, if the container develops significant rust or damage, or if you're storing increasingly valuable or critical electronics. As you gain experience, you might want to build multiple cages of different sizes or invest in more robust containers. Many preppers start with a simple trash can cage, then graduate to multiple specialized cages for different device categories.
The reality is that Faraday cage construction involves some trial and error. Your first attempt might not be perfect, and that's completely normal. Each test teaches you something about electromagnetic shielding, and each improvement makes your protection more reliable. You're building both a physical shield and your own knowledge base.
Taking Your First Step
Building a Faraday cage isn't about achieving laboratory-perfect shielding or military-grade specifications. It's about taking practical steps to protect the electronics you'll need during a crisis. A homemade cage built carefully from an ordinary trash can offers vastly more protection than leaving your devices completely exposed. You now have the knowledge to create that protection using materials you can find this weekend at your local hardware store.
Start your electronic protection plan today with these simple steps. Begin with one cage for your most critical devices—perhaps a backup radio, flashlight, and phone charger. Test it thoroughly, learn from the process, and expand your protection as your confidence grows. You don't need to protect every electronic device you own. Focus on the essentials first, then build from there.
When electromagnetic threats are just theoretical possibilities, taking action now means you'll be ready if theory becomes reality. You've learned the basics, you understand the materials, and you know how to test your work. The only thing left is to actually build your first cage. Pick a weekend, gather your materials, and spend an afternoon creating real protection for your family's essential electronics. You've got this.