Understanding Fallout Room Requirements and Protection Factors
When radioactive fallout drifts through the atmosphere, survival depends on mass—the mass of material standing between you and gamma radiation streaming from contaminated particles outside. Your basement might protect you during a tornado, but against ionizing radiation, intuition fails. You need mathematics, physics, and precise engineering to create a space that genuinely protects.
The protection factor (PF) serves as the fundamental metric for evaluating any fallout shelter's effectiveness. A PF of 40 means you receive one-fortieth the radiation dose inside the shelter that you would receive outside—a 97.5% reduction . According to federal guidelines from FEMA, this PF of 40 represents the absolute minimum threshold for adequate fallout protection during a nuclear event . Anything less leaves you dangerously exposed to radiation levels that cause acute radiation syndrome, cancer, and death.
Understanding why 40 serves as the critical threshold requires grasping the nature of gamma radiation from fallout. Unlike alpha and beta particles that your skin or a sheet of paper can block, gamma rays penetrate deeply. They pass through wood, drywall, and flesh with ease. Only dense materials with substantial thickness can attenuate them effectively. The PF of 40 standard emerged from calculations showing that this level of protection, maintained for the critical first two weeks following detonation, reduces your accumulated radiation dose to survivable levels even in heavily contaminated areas. During those initial 336 hours, radioactive decay follows the "seven-ten rule"—for every seven-fold increase in time, radiation intensity drops by a factor of ten. Your shelter must keep you alive through this exponential decay period.
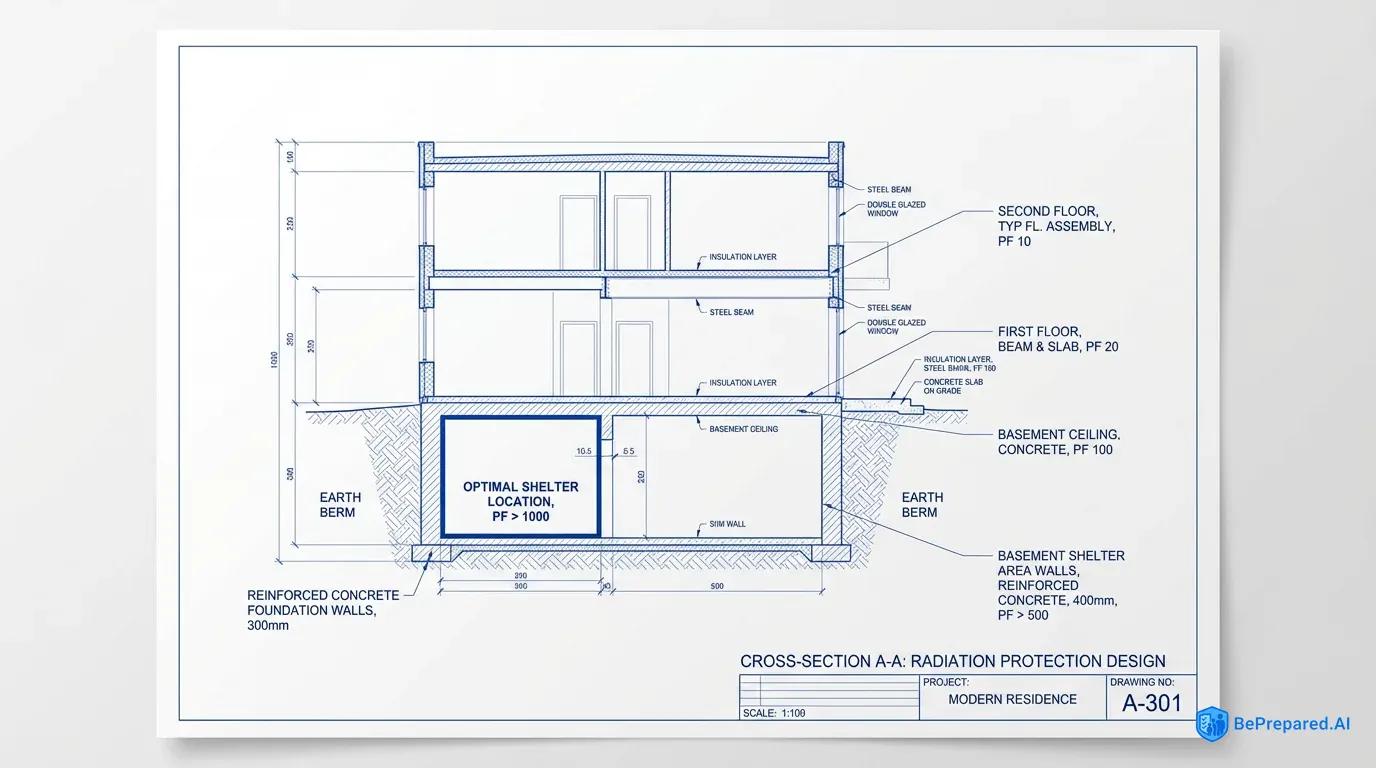
Basement locations provide a natural advantage because earth itself serves as excellent shielding material. A typical basement with three feet of earth covering the ceiling already delivers a PF of approximately 10 to 20, depending on the soil density and moisture content . This baseline protection explains why fallout room construction almost always begins with below-grade spaces. However, that PF of 10 to 20 falls critically short of the required 40. You must engineer additional shielding to bridge this gap, and that engineering begins with understanding your space requirements.
The minimum spatial requirement of 10 square feet per occupant for a 14-day shelter period represents a carefully calculated compromise between protection and livability . Smaller spaces increase shielding efficiency—you need less material to protect a compact area—but create psychological stress, heat buildup, and carbon dioxide accumulation that threaten survival as surely as radiation. Larger spaces feel more comfortable but require proportionally more shielding material, increasing both cost and structural load. For a family of four, you're looking at a minimum 40 square feet of floor space, roughly equivalent to a small bedroom.
The 14-day occupancy period isn't arbitrary. It aligns with the radioactive decay timeline. After two weeks, radiation levels typically drop to roughly 1% of their initial intensity, making brief excursions outside feasible for critical tasks. Your fallout room must sustain life completely independently during this period. That means storing 14 days of water (one gallon per person per day minimum), food requiring no cooking or minimal preparation, and managing waste in a confined space. The engineering calculations for ventilation, discussed in later sections, derive directly from this two-week timeline and the metabolic requirements of the occupants.
Location selection within your basement determines much of your eventual protection factor. Interior corners away from windows and exterior walls provide the best starting point. Each wall between you and the outside world adds shielding mass. A corner location in the center of your home's footprint, ideally beneath a first-floor interior room rather than an overhang, maximizes the earth and structural mass surrounding you. Measure the distance from your proposed shelter location to each exterior wall and to grade level. These measurements feed directly into your protection factor calculations, determining how much additional shielding you must install.
The ceiling represents your most vulnerable surface because it typically has the least mass overhead. While walls benefit from foundation concrete and potentially earth berms, your ceiling might have only floor joists, subfloor, and finished flooring between you and the room above. This asymmetry in protection requires asymmetric shielding—you'll need to add more mass overhead than to your walls. Understanding this principle before you begin construction prevents the common mistake of equally distributing shielding material and ending up with inadequate overhead protection.
- Lead (Pb)
- Density: 11.34 g/cm³ | Superior gamma radiation shielding | Most effective but requires careful handling and ventilation
Material Selection and Calculations
The physics of radiation shielding reduces to a deceptively simple principle: more mass equals more protection. Yet the practical application of this principle demands careful material selection because not all mass provides equal protection per pound, per dollar, or per cubic inch. Your choice of shielding materials determines whether your fallout room becomes an effective refuge or an expensive failure.
Lead sheeting represents the gold standard for radiation shielding in medical and industrial applications. Its exceptional density—11.34 grams per cubic centimeter—means that 1/8 inch of lead reduces gamma radiation intensity by approximately 50% . This property, called the half-value layer thickness, makes lead incredibly space-efficient. A lead-lined fallout room achieves high protection factors in minimal space. However, lead's advantages come with severe practical limitations for residential construction. Material costs vary significantly based on market conditions and supplier, and even a modest fallout room requires thousands of pounds. A 10-foot by 10-foot room with 1/8-inch lead on all six surfaces weighs approximately 2,400 pounds, excluding installation labor and structural reinforcement.
Lead also presents toxicity concerns. During installation, cutting and fitting lead sheets releases particulates that pose serious health risks. Once installed, lead remains stable, but any future modifications require the same protective measures. For most residential applications, lead makes sense only as a supplementary material in specific high-exposure areas rather than as your primary shielding.
Concrete emerges as the practical choice for most fallout room construction. Standard concrete with a density of 147 pounds per cubic foot (2.35 g/cm³) requires greater thickness than lead but remains readily available, relatively inexpensive, and well within the skillset of competent DIY builders or local contractors . The half-value layer for concrete against typical fallout gamma radiation measures approximately 2.4 inches . To achieve a PF of 40 from a baseline of 10, you need to reduce radiation by a factor of 4, requiring approximately 4.8 inches of concrete on your most vulnerable surfaces.
These calculations become more complex when you account for geometry. Radiation doesn't arrive only from directly overhead—it scatters through the atmosphere and reflects off surfaces. Professional shelter designers use complex geometric reduction factors, but a conservative approach for DIY construction involves calculating shielding requirements as if radiation arrives equally from all directions, then adding extra mass to the ceiling and above-grade walls. For a basement corner room, this typically translates to 6 inches of concrete overhead, 4 inches on exterior walls, and 2 inches on interior walls already benefiting from the mass of your home's structure.
Soil and sand provide cost-effective mass when you can accommodate the volume. Dry sand weighs approximately 100 pounds per cubic foot, requiring about 3.5 inches for each half-value layer. However, sand's real advantage comes from its versatility. You can stack sandbags against walls, fill the space between double walls, or pile sand on a reinforced ceiling. A 55-gallon drum filled with dry sand weighs roughly 660 pounds and provides excellent shielding when positioned strategically. The limitation lies in containing the material—sand must be bagged or boxed, and those containers occupy more space than the sand alone would require.
Water serves as an often-overlooked shielding material. With a density of 62.4 pounds per cubic foot, water requires about 4.8 inches for each half-value layer. While less efficient than concrete, water offers the dual benefit of shielding and survival storage. A wall constructed from 5-gallon water containers stacked two high and two deep provides both radiation protection and your drinking water supply. The challenge lies in structural support—water's weight concentrates along the bottom of containers, requiring robust shelving or floor support.
Comparative analysis of common materials reveals practical trade-offs. Steel, with a density of 490 pounds per cubic foot, requires only about 0.9 inches per half-value layer, making it more efficient than concrete but less efficient than lead. However, steel's cost per pound and the difficulty of working with thick steel plate generally limit its use to structural support rather than primary shielding. Brick and concrete block, common in foundation construction, provide moderate shielding—a standard 8-inch concrete block wall delivers roughly one half-value layer of protection.
The most cost-effective approach for most builders combines materials strategically. Start with your existing basement structure, which already provides concrete foundation walls and possibly a concrete floor above. Calculate the protection factor this baseline provides using conservative estimates—assume 8-inch concrete foundation walls and a wood-framed floor above with minimal mass. From this baseline, determine your shielding deficit. Add concrete, sandbags, or water containers to bridge the gap, concentrating the densest materials overhead where they provide maximum benefit.
Thickness calculations must account for material purity and composition. Concrete mixed with heavy aggregates like magnetite or barite provides superior shielding compared to standard concrete with limestone aggregate. If you're pouring concrete specifically for shielding, specify high-density aggregate. The cost premium typically runs 20% to 40% over standard concrete, but the improved shielding efficiency allows you to use less material overall, potentially offsetting the higher cost.
Real-world material availability often constrains your options more than theoretical efficiency. During a crisis that prompts fallout shelter construction, building materials become scarce. Lead sheeting disappears from suppliers. Concrete trucks stop running. Your material selection strategy must include stockpiling or identifying materials you can acquire quickly. Sandbags and sand remain available longer than manufactured products. Water can be stored indefinitely. Concrete blocks purchased gradually over months avoid suspicion and supply chain disruption.
The weight of shielding materials demands structural analysis before you begin installation. Six inches of concrete across a 10-foot by 10-foot ceiling weighs 7,350 pounds—more than three tons concentrated on floor joists designed for residential loads of 40 pounds per square foot. This load requires structural reinforcement, discussed in the next section, but your material selection must consider whether your home's structure can support the reinforcement required. Older homes with undersized joists, homes with span limitations, or homes with existing structural concerns may require lighter shielding approaches using water or sandbags distributed across a larger area to reduce point loads.
Detailed Protection Factor Calculations
Before you purchase a single concrete block or fill your first sandbag, you need precise calculations that account for your specific basement geometry, existing structure, and target protection level. These calculations determine whether your shelter actually achieves PF 40 or leaves you with a false sense of security.
Start by mapping your basement's existing protection. Measure the thickness of your foundation walls—typically 8 to 12 inches of poured concrete or concrete block. Measure the depth of earth against the exterior of these walls from grade level to the top of your foundation. A basement with 3+ feet of packed earth or 2 feet of concrete provides adequate shielding . Calculate the distance from your proposed shelter location to each exterior wall. The farther you position your shelter from exterior walls, the more earth and structure radiation must penetrate to reach you.
Assess your ceiling protection by examining the floor structure above. Measure joist depth, spacing, and the thickness of subfloor and finished flooring. A typical wood-framed floor provides minimal shielding—perhaps equivalent to 2 to 3 inches of concrete when you account for the wood density and any plumbing or ductwork in the joist bays. If your shelter sits beneath a concrete slab on the first floor, measure the slab thickness. A 4-inch concrete slab provides nearly two half-value layers of protection before you add any supplementary shielding.
Use the half-value layer method to calculate required additional shielding. Each half-value layer reduces radiation by 50%. To increase your protection factor from 10 to 40 (a factor of 4 reduction), you need two additional half-value layers (50% × 50% = 25%, which is 1/4). For concrete with a half-value layer of 2.4 inches, you need 4.8 inches of additional shielding on your most vulnerable surfaces.
However, this simplified calculation assumes radiation arrives uniformly from all directions. In reality, radiation intensity varies based on fallout distribution, ground contamination patterns, and shielding geometry. Conservative design adds a safety margin—increase your calculated shielding thickness by 25% to 50% to account for geometric factors, material inconsistencies, and calculation uncertainties. That 4.8 inches of concrete becomes 6 to 7 inches in practice.
Document your calculations in a spreadsheet or notebook. List each surface of your shelter (ceiling, north wall, south wall, east wall, west wall, floor), the existing protection for each surface, the required additional protection, and your planned shielding approach. This documentation guides your material purchases and construction sequence while providing a reference for future modifications or troubleshooting.
Step-by-Step Construction Process
The transformation of an ordinary basement corner into a hardened fallout shelter demands methodical execution. Mistakes during construction can't be corrected once shielding is in place, and inadequate structural preparation leads to catastrophic failure when tons of shielding material stress your home's frame beyond its capacity. Begin this project with the understanding that you're not simply adding a room—you're engineering a life-support bunker within an existing structure never designed for such loads.
Phase One: Assessment and Preparation
Walk your basement with a critical eye, measuring tape, and structural knowledge. Identify your shelter location based on the criteria discussed earlier—interior corner, maximum distance from exterior walls, solid foundation beneath. Once you've selected the location, the real assessment begins. Examine the floor joists above your proposed shelter. Standard residential construction uses 2x10 or 2x12 joists spaced 16 inches on center, designed for a live load of 40 pounds per square foot. Your shielding will impose loads of 150 to 300 pounds per square foot, requiring substantial reinforcement.
Photograph the existing structure from multiple angles, documenting joist size, spacing, span, and condition. Look for existing damage—cracks in foundation walls, water stains indicating moisture intrusion, signs of previous settling or movement. These problems must be corrected before you add shielding weight. A foundation crack that seems minor under normal loads becomes a structural failure point when stressed by additional tons of concrete or sand.
Clear the area completely. Remove all stored items, shelving, and utilities that can be relocated. Exposed concrete floors and walls allow you to inspect for cracks and assess moisture issues. Basement moisture represents one of the most common failure points in fallout shelter construction. Even minor dampness becomes intolerable during a 14-day confinement period. Test for moisture by taping 2-foot squares of plastic sheeting to the floor and walls, sealing all edges with duct tape. After 48 hours, inspect for condensation beneath the plastic. Any moisture indicates a problem requiring remediation before construction proceeds.
Phase Two: Structural Reinforcement
The ceiling above your shelter bears the greatest load and requires the most substantial reinforcement. The standard approach involves installing a network of steel columns and beams that transfer the shielding weight directly to the foundation, bypassing the original floor structure. Calculate the total overhead weight including concrete, framing, and safety margin. For a 10-foot by 10-foot shelter with 6 inches of concrete overhead, you're supporting approximately 7,500 pounds plus the weight of the support structure itself—call it 8,000 pounds total.
Distribute this load across steel columns spaced no more than 6 feet apart in both directions. For this load, 3-inch diameter steel columns with a minimum wall thickness of 1/4 inch provide adequate support. Position columns on concrete footings that distribute the weight across the basement floor. Each footing should measure at least 18 inches square and 8 inches thick, poured directly on the existing basement floor. If your basement has a concrete slab, the slab itself may provide adequate support, but always verify the slab thickness and condition. Slabs less than 4 inches thick or showing significant cracking require additional footings that extend to undisturbed soil.
Connect the columns with steel I-beams sized to carry the distributed load. For a 10-foot span carrying 4,000 pounds, a W8x15 I-beam provides adequate capacity with appropriate safety margin. The beams create a grid that supports the shielding platform above. This structural framework must be engineered—the calculations above provide general guidance, but your specific situation may require larger or smaller members depending on spans, loads, and existing structure. Consult with a structural engineer or use published load tables from the American Institute of Steel Construction to verify your design.
Bolt the columns to both the footings below and the beams above using structural bolts—minimum 3/4 inch diameter, grade 5 or better. Welding provides superior strength if you have welding equipment and skills, but properly torqued bolts create connections adequate for static loads. The key lies in rigidity—the entire framework must function as a unit, with no movement or flexing under load.
Phase Three: Wall Construction and Shielding Installation
With structural support in place, construct the shelter walls. The most practical approach uses concrete block for the primary structure, then adds supplementary shielding as needed to achieve your target protection factor. Standard 8-inch concrete blocks provide approximately one half-value layer of protection. Stack blocks in running bond pattern, using standard masonry techniques. Fill the cores with concrete and rebar every 4 feet vertically and horizontally to create a reinforced wall.
For walls requiring additional shielding beyond what the concrete block provides, build a double-wall system with a gap between. The outer wall, against your basement foundation, uses standard concrete block. The inner wall, defining your shelter interior, uses another course of block spaced 6 to 12 inches from the outer wall. Fill this gap with sand, pea gravel, or concrete. Sand and gravel allow easier future modifications but require containment to prevent settling. Concrete provides permanent, maintenance-free shielding but makes future changes impossible.
The ceiling shielding presents the greatest installation challenge. The steel framework supports a platform of 3/4-inch plywood sheathing, creating a surface for the shielding material. For poured concrete, build forms around the perimeter using 2x8 lumber braced against lateral pressure. Install rebar in a 12-inch grid, tying intersections with wire. Pour the concrete in a single session if possible, working from one corner and using a concrete vibrator to eliminate air pockets. A 6-inch pour across 100 square feet requires approximately 1.9 cubic yards of concrete—more than most transit-mix trucks will deliver for a minimum order, so plan to order enough concrete for other projects or pay a premium for short-load delivery.
Alternatively, build the ceiling from stacked concrete blocks laid flat, creating a 4-inch or 8-inch thick shield depending on whether you use standard or double-stacked blocks. This approach requires no forming or curing time but demands careful attention to ensuring blocks remain level and fully supported. Top the blocks with a layer of 3/4-inch plywood, then add sandbags or water containers to reach your target shielding thickness.
Phase Four: Ventilation System Installation
Your shelter requires continuous air exchange to prevent carbon dioxide buildup and maintain oxygen levels. Federal civil defense standards specify a minimum ventilation rate of 15 cubic feet per minute (CFM) per occupant for shelters without air conditioning . For a four-person shelter, you need 60 CFM of fresh air continuously. In practice, 10 to 15 CFM per occupant provides adequate ventilation for most conditions, with higher rates improving comfort during warm weather or high-activity periods.
Install ventilation pipes through the shielding before you seal the shelter. Use 4-inch PVC pipe for intake and exhaust, routing them through the shielding at angles that prevent radiation streaming—never run pipes straight through shielding. Instead, create a baffle by running the pipe horizontally through the shielding for at least 12 inches before turning upward. This offset prevents gamma rays from traveling directly down the pipe into your shelter.
The intake pipe should draw air from as high as possible—ideally above first-floor level—where fallout particle concentration is lower. The exhaust pipe should terminate near ground level, creating a natural convection current. For mechanical ventilation, install a hand-crank or battery-powered fan capable of moving your required CFM against the static pressure created by the baffled pipes and any filtration. A Kearny Air Pump, a DIY design from Cold War civil defense research, provides adequate ventilation using only manual operation and can be constructed from cardboard, plastic sheeting, and duct tape.
Calculate the pipe diameter needed for your target airflow. A 4-inch pipe flowing at 3 feet per second delivers approximately 15 CFM. For 60 CFM, you need either a larger pipe (6-inch diameter) or higher velocity (12 feet per second in a 4-inch pipe). Higher velocities increase noise and static pressure, requiring more powerful fans. Multiple smaller pipes often work better than a single large pipe because they allow you to create the necessary baffles without excessive pressure drop.
Phase Five: Waterproofing and Environmental Control
Moisture control determines whether your shelter remains habitable for 14 days or becomes a miserable, mold-infested box within 48 hours. Apply waterproofing to all concrete surfaces using a high-quality masonry waterproofing paint or membrane system. Pay particular attention to the joints between floor and walls, where water most commonly enters. Install a sump pump in the lowest corner of your shelter, with the discharge line routing to your home's existing sump system or to daylight. Battery backup for the sump pump is essential—power failures often accompany the emergencies that drive you into your shelter.
Control interior humidity using desiccant materials. Silica gel, calcium chloride, or commercial desiccant products absorb moisture from the air. For a 100-square-foot shelter, maintain at least 10 pounds of desiccant, refreshing or replacing it every 3 to 4 days during occupancy. Moisture-absorbing materials also help manage condensation on cool concrete surfaces when warm, humid air from occupants meets cold walls.
Install a vapor barrier on the interior walls and ceiling using 6-mil polyethylene sheeting. Overlap seams by at least 6 inches and seal with construction adhesive or specialized vapor barrier tape. This barrier prevents moisture from your breathing and perspiration from penetrating into the concrete, where it would promote mold growth and gradually degrade your shielding materials.
The final construction step involves installing your shelter door. A standard hollow-core door provides essentially no radiation shielding. Your door must incorporate shielding equivalent to your walls—typically a solid-core wood door with lead sheeting attached, or a custom steel door filled with concrete or sand. The door frame requires weatherstripping to seal against air infiltration and a robust latch system. During a fallout event, you may need to seal the door completely using duct tape over the gaps, so design the door and frame to accommodate this without preventing the door from opening when you need to exit.
Phase Six: Interior Finishing and Testing
Once the structural elements are complete, finish the interior for habitability. Install LED lighting powered by your electrical system—LEDs consume minimal power while providing adequate illumination. Mount lights on the ceiling and walls to eliminate shadows and create a less oppressive environment. Paint interior surfaces with light colors to maximize light reflection and create a sense of openness despite the confined space.
Build or install storage for your supplies. Wall-mounted shelving maximizes floor space while keeping supplies organized and accessible. Store water containers along walls where they provide supplementary shielding. Position food storage, medical supplies, and equipment where you can reach them easily during the stress of an actual emergency.
Install sleeping accommodations appropriate for your family size. Bunk beds maximize vertical space, allowing four people to sleep in a 40-square-foot room. Alternatively, use folding cots that can be stored against walls during waking hours, freeing floor space for other activities. Include bedding, pillows, and comfort items that make the space more tolerable during extended occupancy.
Test your completed shelter before you need it. Conduct a 48-hour occupation drill with your family, sealing the shelter and operating all systems as if during an actual emergency. Monitor CO₂ levels, temperature, humidity, and occupant comfort. This test reveals problems with ventilation adequacy, power consumption, water storage accessibility, and waste management that you can address before they become life-threatening.
Measure the actual protection factor of your completed shelter using a radiation survey meter if you have access to one. While you can't create actual fallout for testing, you can use the meter to verify that your shielding has no gaps or thin spots where radiation could penetrate. Check around the door, ventilation pipes, and any penetrations for electrical or plumbing. Seal any gaps with additional shielding material.
Essential Systems and Equipment
The engineering that protects you from radiation means nothing if you suffocate, dehydrate, or succumb to waste-related disease during your shelter stay. The systems that maintain life inside your sealed, shielded space require the same careful planning and robust implementation as the shielding itself. These systems transform your fallout room from a radiation-proof tomb into a genuine survival shelter.
Air Filtration and Quality Management
While your ventilation system exchanges air, the quality of that incoming air determines your survival in a fallout scenario. Radioactive particles suspended in outside air will enter through your ventilation system unless you filter them out. Standard HVAC filters, even high-efficiency models, provide inadequate protection against the submicron particles that carry radioactive isotopes. You need HEPA filtration capable of removing 99.97% of particles 0.3 microns and larger .
Install HEPA filters in your intake ventilation line, positioning them inside your shielded space where you can access them for inspection and replacement. The filter housing must create an airtight seal—any bypass allows unfiltered air to enter. Commercial nuclear-grade filter housings provide the highest assurance, but you can construct adequate housings from plywood boxes with gasket seals, ensuring all air passes through the filter media.
The challenge with HEPA filtration lies in the static pressure drop across the filter. High-efficiency filtration restricts airflow, requiring more powerful fans to maintain your target CFM. Calculate the pressure drop for your specific filter at your required flow rate—manufacturers provide this data—then select fans capable of delivering your target CFM against that pressure. A typical HEPA filter might create 1 to 2 inches of water column pressure drop, requiring fans rated for at least 150% of your target CFM to maintain adequate flow.
Monitor air quality inside the shelter using carbon dioxide meters. CO₂ concentration provides the most practical indicator of ventilation adequacy. Outdoor air contains approximately 400 parts per million (PPM) CO₂. Indoor concentrations below 1,000 PPM indicate good ventilation. Levels of 1,000 to 2,000 PPM cause drowsiness and reduced cognitive function. Above 2,000 PPM, you risk headaches and nausea. Above 5,000 PPM, serious health effects occur. Your ventilation system must maintain CO₂ below 1,000 PPM even with all occupants present and the shelter sealed.
Backup air filtration using improvised methods provides redundancy. A Kearny Fallout Meter (KFM), constructed from plans available in civil defense publications, allows you to measure radiation levels and determine when fallout has settled enough that unfiltered ventilation becomes acceptable. During the initial hours after fallout arrival, when radiation peaks, you might choose to seal the shelter completely, relying on the existing air volume. A 10-foot by 10-foot by 8-foot shelter contains 800 cubic feet of air. Four adults consume approximately 1 cubic foot of oxygen per hour, meaning the shelter's air supports four people for roughly 40 hours before oxygen depletion becomes critical—well beyond the period of peak fallout danger.
Water Storage and Management
The standard recommendation of one gallon per person per day for a 14-day period means storing 56 gallons for a family of four. This minimum covers drinking and minimal hygiene but provides no margin for error, spillage, or extended shelter stays. A more robust approach stores 1.5 to 2 gallons per person per day, totaling 84 to 112 gallons for four people.
Store water in food-grade containers designed for long-term storage. Five-gallon water jugs, when stacked strategically, double as radiation shielding for walls as discussed earlier. Fifty-five-gallon drums provide space-efficient storage but create handling challenges—a full 55-gallon drum weighs 460 pounds and cannot be moved easily within the confined shelter. Distribute water storage between large drums for bulk supply and smaller containers for daily use.
Treat stored water with water preservation concentrate or household bleach to prevent bacterial growth. Add 1/8 teaspoon of unscented household bleach per gallon of water, or follow the instructions for commercial water preservation products. Rotate stored water every six months, using the old water for gardening or other purposes and refilling with fresh water.
Include water filtration capability for extending your supply. A quality gravity-fed filter system with ceramic or carbon elements can purify water from your hot water heater, toilet tanks (not bowls), or even condensation collected from your shelter's surfaces. This backup capability transforms your 14-day supply into a potentially longer-term resource if the situation demands extended shelter time.
Label all water containers with the fill date and treatment information. During a crisis, you need to know which containers hold the freshest water and which might need additional treatment before consumption. Clear labeling prevents confusion and potential illness from consuming contaminated water.
Waste Management Systems
The topic no one wants to discuss, but everyone must address—human waste management in a sealed shelter presents serious health and comfort challenges. For a four-person shelter over 14 days, you're managing approximately 56 person-days of waste. Without proper systems, your shelter becomes uninhabitable within days regardless of the radiation outside.
The simplest approach uses a portable toilet with chemical treatment. Marine and RV toilets designed for holding tank use provide the most practical solution. These units contain waste in a sealed tank, with chemical additives that suppress odors and break down solids. A 5-gallon capacity toilet requires emptying every 2 to 3 days for four people, which presents a challenge during shelter occupancy. Design your shelter with a waste holding area separated from the main living space by a curtain or partition, and store waste containers in this area until you can safely exit to dispose of them.
Alternatively, implement a bucket toilet system with heavy-duty plastic bags and chemical treatment. Line a 5-gallon bucket with a contractor-grade garbage bag, add chemical treatment powder or sawdust after each use, and seal completed bags for storage. This approach requires more hands-on management but costs less than commercial portable toilets and allows you to stockpile supplies inexpensively.
Urine diversion significantly reduces waste management burden. Males can urinate into dedicated containers—1-gallon jugs with screw caps work well—keeping urine separate from solid waste. This separation eliminates the primary odor source and reduces the volume of material requiring chemical treatment. Urine can be stored in sealed containers much more easily than combined waste.
Stock adequate supplies of toilet paper, hand sanitizer, and disinfecting wipes. Calculate consumption based on your family's normal usage, then double it to account for stress-related increases and the lack of normal bathing facilities. Store these supplies in sealed plastic containers to protect them from moisture and contamination.
Communication and Monitoring Equipment
Your shelter's shielding that protects you from radiation also blocks radio signals. Standard cell phones, AM/FM radios, and walkie-talkies experience severe signal degradation through concrete and earth shielding. You need communication systems specifically designed for shielded environments.
Install a wire antenna system that extends from your shelter through the shielding to the outside world. A simple wire antenna running through a ventilation pipe or dedicated antenna port allows you to receive AM/FM broadcasts and shortwave transmissions. The antenna wire should extend at least 20 feet outside the shelter for effective reception. Connect this external antenna to a battery-powered radio inside the shelter, allowing you to monitor emergency broadcasts and government instructions.
For two-way communication, a CB radio or amateur radio (ham radio) system with an external antenna provides the most reliable option. The external antenna, mounted on your roof or a pole outside, connects to the radio inside via coaxial cable running through your shielding. This configuration allows you to transmit and receive despite the shielding. If you pursue this option, obtain your amateur radio license before an emergency—operating without a license is illegal during normal times, though regulations relax during declared emergencies.
Include a hand-crank emergency radio as backup. These devices require no batteries and receive NOAA weather radio broadcasts, AM/FM stations, and often shortwave frequencies. The hand-crank charging system ensures functionality even if your battery stockpile depletes.
Monitor radiation levels using dosimeters and survey meters. Personal dosimeters track accumulated radiation exposure for each shelter occupant, providing critical data for deciding when to exit the shelter or how long you can safely work outside. Survey meters measure current radiation levels, allowing you to assess whether fallout has decayed to safe levels. A Kearny Fallout Meter, mentioned earlier, can be constructed from household materials and provides adequate radiation measurement capability for fallout scenarios, though it lacks the precision of commercial instruments.
Stock spare batteries for all electronic equipment. Calculate your expected battery consumption based on the runtime of each device, then triple that estimate to account for battery degradation, unexpected equipment failures, and potential extended shelter stays. Store batteries in a cool, dry location within the shelter, rotating stock every year to ensure freshness.
Power Systems
Your shelter systems demand electrical power for ventilation fans, lighting, communication equipment, and monitoring devices. Calculate your total power requirements by listing each device, its wattage, and expected runtime. A typical four-person shelter might require 200 to 400 watt-hours per day—ventilation fans running continuously at 20 watts, LED lighting for 8 hours at 10 watts, communication equipment for 2 hours at 50 watts, and monitoring equipment running continuously at 5 watts.
Deep-cycle batteries provide the most practical power storage for shelter use. A 100-amp-hour 12-volt battery stores 1,200 watt-hours of energy, theoretically providing 3 to 6 days of power for a modest shelter. Install at least two batteries in parallel for redundancy, and include a charge controller and inverter for running AC devices. Position batteries in a ventilated area separate from the main living space—batteries release hydrogen gas during charging, creating an explosion risk in confined spaces.
Solar panels on your roof, connected via cables running through your shielding, can recharge batteries during shelter occupancy if fallout levels permit the panels to remain exposed. This approach requires careful calculation of radiation exposure to the panels and cables, but in many scenarios, the radiation levels that threaten human life don't significantly damage solar panels in the short term.
Include backup power options—hand-crank generators, additional battery banks, or even a small gasoline generator positioned outside the shelter with exhaust routed safely away and power cables running inside. Redundancy in power systems prevents the catastrophic failure mode where your ventilation stops, your lights go dark, and you're forced to choose between suffocation and radiation exposure.
Wire your shelter's electrical system using marine-grade components designed for harsh environments. Use waterproof junction boxes, sealed switches, and LED fixtures rated for damp locations. The confined, potentially humid environment inside your shelter will corrode standard electrical components rapidly, leading to failures when you need the systems most.
Install a power monitoring system that displays battery voltage, current draw, and estimated runtime remaining. This information allows you to manage power consumption, shutting down non-essential systems to extend battery life if recharging becomes impossible. Simple volt meters and amp meters, available from marine supply stores, provide adequate monitoring capability at low cost.
Food Storage and Preparation
Your 14-day food supply must meet several criteria: long shelf life, minimal preparation requirements, adequate nutrition, and palatability under stress. Freeze-dried meals designed for backpacking provide excellent nutrition and taste while requiring only hot water for preparation. However, heating water consumes fuel or electricity, adding to your resource requirements.
Stock a mix of foods requiring no preparation—energy bars, canned goods that can be eaten cold, dried fruits, nuts, and shelf-stable milk or milk alternatives. Supplement these with foods requiring minimal preparation—instant oatmeal, ramen noodles, instant rice, and dehydrated soups. Calculate calories based on 2,000 to 2,500 per person per day, recognizing that stress and confined conditions may reduce appetite while increasing caloric needs.
Include comfort foods that boost morale—chocolate, cookies, hard candy, coffee, and tea. The psychological benefit of familiar, enjoyable foods during a crisis cannot be overstated. Allocate 10% to 15% of your food storage to these morale-boosting items.
Store food in sealed, rodent-proof containers. Five-gallon buckets with gamma seal lids provide excellent protection while remaining accessible. Label each container with contents and storage date. Rotate food stocks annually, consuming older items and replacing them with fresh supplies.
If you include foods requiring heating, stock adequate fuel. A small camp stove with butane or propane cartridges provides cooking capability without producing dangerous carbon monoxide levels if properly vented. Calculate fuel consumption based on your planned meals—a typical butane cartridge provides approximately 90 minutes of cooking time. For 14 days with one hot meal per day, you need at least 8 to 10 cartridges.
Medical Supplies and Sanitation
Stock a comprehensive first aid kit sized for your family and the 14-day period. Include prescription medications for all family members, with at least a 30-day supply to account for potential extended shelter stays. Rotate medications before they expire, using them in daily life and replacing them with fresh prescriptions.
Include over-the-counter medications for common ailments—pain relievers, anti-diarrheal medication, antacids, antihistamines, and cough suppressants. The stress of shelter confinement often triggers or exacerbates minor health problems. Stock adequate supplies to treat these issues without depleting your resources.
Sanitation supplies beyond waste management include soap, hand sanitizer, disinfecting wipes, and personal hygiene items. Women should stock adequate feminine hygiene products. Include dental care items—toothbrushes, toothpaste, and floss. Maintaining basic hygiene prevents illness and maintains morale during confinement.
Stock cleaning supplies for maintaining the shelter environment. Disinfectant spray, paper towels, and trash bags allow you to clean surfaces, manage spills, and maintain sanitary conditions. A spray bottle filled with diluted bleach solution provides effective disinfection for surfaces, waste containers, and any contaminated items.
The integration of these systems—air, water, waste, communication, power, food, and medical—creates a functional survival environment. Test each system individually, then conduct full-scale occupation drills with all systems running simultaneously. You'll discover interference between systems, unanticipated resource consumption, and human factors that only emerge during realistic testing. A weekend spent in your shelter with your family, with all systems operational and the door sealed, reveals problems you can fix now rather than discovering them when radiation makes troubleshooting impossible.
Maintenance and Long-Term Readiness
Your fallout room represents a substantial investment of time, money, and effort. The difference between a successful shelter and a dangerous failure lies not in the amount of concrete you pour or the thickness of your shielding, but in the systematic attention to every detail of design, construction, and system integration. The protection factor calculations ensure you survive the radiation. The systems and equipment ensure you remain alive, healthy, and capable of emerging when the danger passes to rebuild in a changed world.
Quarterly inspections maintain your shelter's readiness. Check all stored water for leaks, algae growth, or container degradation. Inspect food supplies for pest intrusion, packaging damage, or expiration dates approaching. Test all electronic equipment—radios, meters, lights, and fans—replacing batteries as needed. Run your ventilation system for at least 30 minutes to verify proper operation and identify any mechanical issues.
Annual maintenance includes more thorough inspections. Examine the structural elements—columns, beams, and shielding—for cracks, corrosion, or movement. Check waterproofing for failures, reapplying sealants as needed. Test your power system under load, verifying that batteries hold charge and inverters function correctly. Replace any components showing signs of degradation before they fail.
Document all maintenance activities in a logbook stored in the shelter. Record dates, observations, and actions taken. This documentation helps you track trends—a battery that fails after 18 months suggests you should replace all batteries of that type—and ensures that maintenance doesn't get overlooked during busy periods.
Update your shelter supplies and systems as your family changes. A shelter designed for four people becomes inadequate when a fifth family member arrives. Recalculate your space, ventilation, water, food, and waste management requirements whenever your family size changes. Adjust your stockpiles and systems accordingly.
Stay informed about developments in shelter technology and civil defense. New materials, better filtration systems, and improved monitoring equipment become available over time. Upgrading your shelter incrementally keeps it current without requiring complete reconstruction. Join online communities of shelter builders and preppers to share knowledge, learn from others' experiences, and stay motivated to maintain your readiness.
Your fallout shelter represents hope—the hope that you and your family can survive the unthinkable and emerge to rebuild. That hope demands respect through diligent preparation, careful construction, and ongoing maintenance. The shelter you build today may sit unused for years or decades. But when the moment comes, when the sirens sound and fallout begins to fall, your shelter will fulfill its purpose only if you've done the work correctly. There are no second chances, no opportunities to fix mistakes once you're sealed inside with radiation levels rising outside. Build it right. Maintain it properly. And pray you never need it.