Understanding Home Medical Quarantine Requirements
The call comes at 2 AM. Your teenage daughter has a high fever, and the urgent care clinic just confirmed she has a highly contagious respiratory infection. The doctor's instructions are clear: strict home isolation for at least seven days. You hang up the phone and realize you have no idea how to actually protect the rest of your family while caring for her. This scenario plays out in thousands of households every year, and most people are woefully unprepared for what comes next.
Medical quarantine at home isn't simply asking someone to stay in their bedroom. It's a systematic approach to isolating an infected person while minimizing transmission risk to other household members. The Centers for Disease Control and Prevention defines home quarantine as the separation of someone who has or may have a contagious disease from others who are not sick . The sick person should stay in a separate room away from other people and pets . This differs from general "staying home when sick" advice because it involves specific protocols designed to create a barrier between the infected individual and healthy household members.
Understanding when quarantine becomes necessary helps you respond appropriately rather than either overreacting to minor illnesses or underestimating serious transmission risks. Home quarantine is typically warranted for diseases with significant community transmission potential, including influenza, COVID-19, measles, mumps, chickenpox, and certain bacterial infections like pertussis. Public health authorities may also recommend quarantine for household contacts of someone diagnosed with a serious communicable disease, even before symptoms appear. The key distinguishing factor is transmission risk—if the illness spreads easily through respiratory droplets, direct contact, or airborne particles, isolation protocols become critical.
The fundamental principle underlying effective home isolation is creating physical and environmental separation between the sick person and others. This goes beyond just keeping someone in a different room. According to CDC guidelines, proper isolation requires a separate bedroom with a dedicated bathroom when possible, minimizing shared air space, and establishing clear boundaries around contaminated zones . Studies suggest that proper isolation can substantially reduce transmission risk compared to casual separation where infected individuals still share common spaces, bathrooms, and meal times with healthy household members.
The science behind isolation effectiveness is straightforward: most contagious diseases spread through proximity. Respiratory pathogens travel in droplets that typically fall within six feet, though some can remain suspended in air for extended periods. Direct contact with contaminated surfaces transfers viruses and bacteria to hands, which then frequently touch faces throughout the day. By controlling these exposure pathways through systematic isolation, you dramatically reduce the probability that other household members will become infected. This isn't about creating a hospital-grade containment facility in your home—it's about understanding transmission mechanisms and implementing practical barriers that interrupt disease spread.
The psychological aspect of home quarantine also deserves consideration. The isolated person may feel lonely, anxious, or guilty about disrupting the household. Other family members might experience fear of infection or resentment about additional caregiving burdens. Recognizing these dynamics upfront and establishing clear communication protocols helps everyone manage the stress of an isolation period. The goal is protecting health while maintaining human connection through safe methods—video calls, notes under the door, or conversations through closed doors all preserve emotional bonds without physical proximity.
Selecting and Preparing the Isolation Room
Walk through your home right now with isolation in mind. Which room would you choose? Most people instinctively think of the bedroom farthest from common areas, but effective isolation room selection requires evaluating several critical factors that aren't immediately obvious.
Step 1: Evaluate room location and accessibility. The ideal isolation room sits at the end of a hallway or in a separate area where the sick person can access their space without walking through high-traffic zones. Choose a room with good air flow and separate bathroom when possible . If that's not available, choose the room closest to a bathroom that can be designated exclusively for the quarantined individual. Consider the path from the isolation room to the bathroom—every surface along that route becomes a potential contamination zone requiring regular disinfection. If you have a multi-story home, selecting a room on a different floor from main living areas provides additional separation, though this creates challenges for caregiving and monitoring.
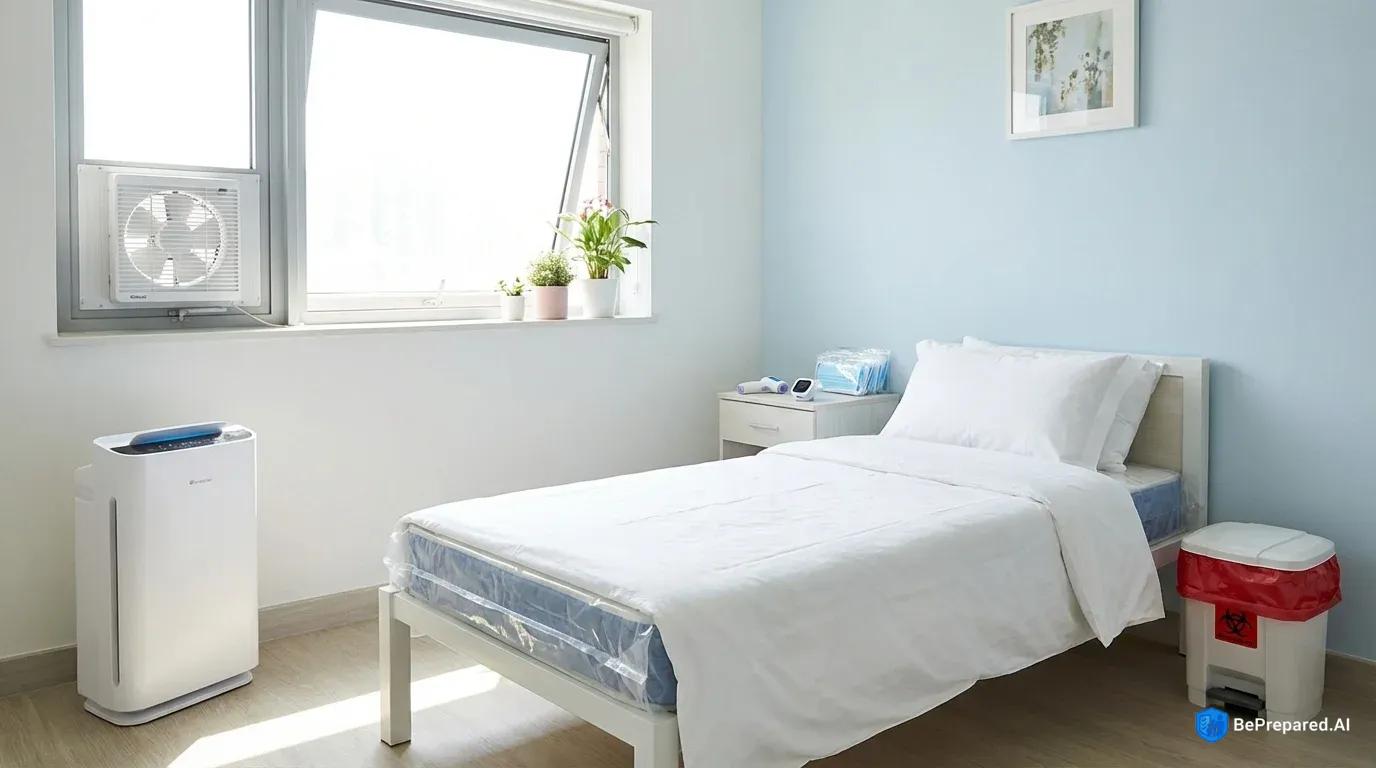
Step 2: Assess and optimize ventilation. This step matters more than most people realize. The American Society of Heating, Refrigerating and Air-Conditioning Engineers (ASHRAE) recommends creating negative air pressure in isolation rooms, meaning air flows into the room from the rest of the house but doesn't flow back out . While achieving true negative pressure requires specialized equipment, you can approximate this condition by understanding your home's air patterns. Open the isolation room window several inches to create an exhaust point. Close the door and place a rolled towel along the bottom gap to reduce air flowing from the room into the hallway. If you have a window fan, orient it to blow air outward, pulling fresh air from under the door and expelling it outside. This creates a one-way air flow that prevents contaminated air from circulating to other rooms.
Run your heating and cooling system on the "fan" setting rather than "auto" to maintain continuous air circulation. If your system has one, install a high-efficiency MERV 13 or higher filter to capture respiratory droplets. Some households invest in a portable HEPA air purifier for the isolation room itself. HEPA air purifiers remove 99.97% of airborne particles 0.3 microns or larger , significantly reducing viral load in the air. Use portable HEPA filters rated for at least 12 air changes per hour . Position the purifier away from the sick person so it doesn't blow contaminated air directly toward them, but rather pulls room air through the filter continuously.
Step 3: Prepare surfaces and remove unnecessary items. Before the sick person enters the isolation room, strip it down to essentials. Remove decorative pillows, stuffed animals, books, and anything with porous or difficult-to-clean surfaces. Fabric items trap pathogens and require laundering, while hard surfaces can be wiped down with disinfectant. Studies indicate that smooth, cleanable surfaces help reduce contamination risk by limiting the places where viruses and bacteria can persist . Replace fabric lampshades with metal or plastic ones if possible. Remove area rugs or replace them with washable bath mats that can be laundered in hot water daily.
Wipe down all hard surfaces with disinfectant before isolation begins—this creates a clean baseline. Pay special attention to high-touch surfaces like doorknobs, light switches, drawer pulls, and the headboard. If the room has a dresser or nightstand, clear the top surfaces completely so you can wipe them down quickly during daily cleaning. Consider covering the mattress with a waterproof, wipeable mattress protector. This not only protects the mattress from contamination but also makes daily surface disinfection more thorough.
Step 4: Establish supply staging areas. Designate a "clean zone" just outside the isolation room door where you'll place food trays, fresh linens, and supplies. A small folding table works perfectly for this purpose. This staging area prevents you from entering the contaminated room for every delivery. Similarly, establish a "dirty zone" on the other side of the door where the sick person can place items for removal—trash bags, dishes, or soiled laundry. This one-way flow system minimizes your exposure while ensuring the quarantined person has everything they need.
Step 5: Set up communication and monitoring systems. Before isolation begins, test your communication methods. A baby monitor, smartphone on video call, or simple bell system allows the sick person to request help without requiring you to check on them constantly. Install a whiteboard on the inside of the door where they can write requests visible through the door window, or use a shared note-taking app on smartphones. These systems reduce the frequency of room entry, which directly correlates with reduced transmission risk.
- Communication Tools Section
- Battery-powered radio, backup phone chargers, emergency contact list, local authority frequencies
- Documentation Zone
- Copies of essential documents, emergency protocols, quarantine guidelines, medical histories, insurance information
Essential Supplies and Equipment
Proper home quarantine fails without the right supplies assembled before you need them. Scrambling to find a thermometer at midnight or running out of disinfectant mid-quarantine compromises the entire isolation protocol. The following categories represent the core equipment that transforms a bedroom into a functional isolation space.
Medical Monitoring Tools:
- Digital thermometer with disposable probe covers: Monitor temperature at least twice daily . Disposable covers prevent cross-contamination if the thermometer must be used by others.
- Pulse oximeter: This fingertip device measures blood oxygen levels, providing early warning of respiratory complications. Normal readings typically range from 95-100%; readings below 92% generally warrant medical attention.
- Blood pressure monitor (if relevant to the illness): For individuals with underlying conditions or certain infections, tracking blood pressure provides valuable health data.
- Symptom tracking journal or app: Documenting symptoms, medication timing, and vital signs creates a medical record useful for telehealth consultations or emergency room visits.
Personal Protective Equipment for Caregivers:
- Disposable medical-grade masks or N95 respirators: Proper PPE combined with other precautions can substantially reduce transmission risk . Stock at least 20 masks for a two-week isolation period.
- Disposable gloves (nitrile or latex): Use when handling contaminated items, delivering food, or cleaning. Plan for 10-15 pairs per day.
- Face shields or safety glasses: Protect your eyes from respiratory droplets when entering the isolation room.
- Disposable gowns or dedicated washable coveralls: Worn over clothing when providing direct care, then removed before leaving the contaminated zone.
Cleaning and Disinfection Supplies:
- EPA-registered disinfectant effective against viruses: Look for products listing specific kill times for pathogens. Stock enough for twice-daily surface cleaning for the quarantine duration.
- Bleach solution (1/3 cup bleach per gallon of water): Mix fresh daily for high-touch surface disinfection.
- Paper towels (not reusable cloths): Disposable cleaning materials prevent cross-contamination.
- Trash bags with ties: Double-bagging contaminated waste adds a safety layer.
- Laundry sanitizer or access to hot water: Properly laundering contaminated linens in hot water kills most pathogens.
Room Environment and Comfort:
- HEPA air purifier: As mentioned earlier, these units remove 99.97% of airborne particles , significantly reducing viral concentration in the isolation room.
- Humidifier: Maintaining 40-60% humidity helps respiratory comfort and may reduce viral transmission.
- Window fan (if weather permits): Improves ventilation and helps establish directional airflow.
- Extra bedding and towels: Having multiple sets allows for frequent changes without immediate laundering pressure.
Communication and Entertainment:
- Dedicated smartphone or tablet: Enables video calls, telehealth appointments, and entertainment without sharing devices.
- Baby monitor or intercom system: Allows monitoring without entering the room.
- Books, puzzles, or other entertainment: Isolation is mentally challenging; having engaging activities supports psychological wellbeing.
Food and Hydration:
- Disposable plates, cups, and utensils: Eliminates dishwashing contamination risk, though it generates more waste.
- Insulated food containers: Keeps meals at safe temperatures during the delivery-to-consumption window.
- Water bottles or large water pitcher: Reduces delivery frequency while ensuring adequate hydration.
- Nutritious, easily digestible foods: Stock soups, crackers, electrolyte drinks, and foods appropriate for the specific illness.
Medication and Medical Supplies:
- Prescribed medications with full quarantine period coverage: Running out of essential medications during isolation creates unnecessary complications.
- Over-the-counter symptom relievers: Pain relievers, cough suppressants, and decongestants appropriate for the patient's age and condition.
- Tissues and personal hygiene items: Stock generously to avoid mid-quarantine resupply needs.
Download our Complete Home Quarantine Setup Checklist to ensure you have every essential item before you need it. This comprehensive resource includes quantity recommendations, product specifications, and supplier suggestions for building a complete home isolation kit.
Daily Operations and Protocols
The supplies are staged, the room is prepared, and isolation begins. Now comes the challenging part: maintaining rigorous protocols day after day without becoming complacent. Most home quarantine failures occur not from poor initial setup but from gradual erosion of protective practices as fatigue sets in.
Step 1: Establish and maintain entry/exit procedures. Every time you approach the isolation room, pause and mentally rehearse the protocol. This brief moment of mindfulness prevents the casual mistakes that lead to exposure. Before entering, don your PPE in the clean zone outside the door: put on the disposable gown first, then the mask (ensuring it fits snugly over nose and mouth), then the face shield, and finally the gloves. The sequence matters because you want the most contaminated items (gloves) on last so they're removed first.
Knock and announce yourself before entering, giving the sick person time to put on their mask if they're able. Open the door minimally—just enough to slip through—to reduce air exchange with the hallway. Once inside, stay near the door if possible rather than moving throughout the room. Complete your task efficiently: deliver the meal tray, collect the trash, check on the person's condition, or perform whatever care is necessary. Avoid touching your face, adjusting your mask, or touching any surface unnecessarily.
Exiting requires even more care than entering because you're now potentially contaminated. Before leaving the room, remove your gloves by peeling them off inside-out, trapping contaminants inside. Drop them in the trash bag inside the room. Remove the gown by rolling it inward, again trapping the contaminated exterior inside. Place it in the same trash bag. Exit the room and close the door. Now in the clean zone, remove your face shield and disinfect it with a wipe, then remove your mask by touching only the ear loops or ties, never the front surface. Dispose of the mask if it's single-use, or place it in a designated container if you're reusing N95s according to proper protocols. Immediately wash your hands for at least 20 seconds with soap and water.
Step 2: Implement systematic waste management. Contaminated waste requires careful handling to prevent it from becoming a household transmission source. Inside the isolation room, maintain a dedicated trash can lined with two bags. When the inner bag is three-quarters full, the sick person should tie it closed and place it inside the outer bag, which they also tie closed. This double-bagged waste is then placed in the "dirty zone" outside the door for you to collect while wearing gloves.
Transport the waste bag directly to an outdoor trash container without setting it down anywhere inside your home. If local regulations allow, you might write "MEDICAL WASTE" on the bag to alert sanitation workers, though household medical waste from home quarantine is generally acceptable in regular trash. Wash your hands immediately after handling waste bags, even though you wore gloves—this redundancy provides an extra safety margin.
Step 3: Execute twice-daily vital sign monitoring and symptom checks. Monitor temperature at least twice daily , typically morning and evening. Establish a consistent schedule—perhaps 8 AM and 8 PM—and stick to it religiously. These data points create a timeline that helps identify improving or deteriorating conditions. During each check, also assess respiratory rate, pulse oximetry reading, and subjective symptoms like cough severity, energy level, and pain.
Document everything in a dedicated notebook or digital log. Note not just the numbers but also context: "Temperature 100.8°F, down from 101.3°F this morning. Patient reports better sleep, less body aches, but cough still productive." This narrative provides valuable information for telehealth providers or emergency responders if the situation escalates. Set specific thresholds that trigger medical consultation: high fever that doesn't respond to medication, oxygen saturation that drops into concerning ranges, severe difficulty breathing, confusion, or inability to stay hydrated.
Step 4: Maintain rigorous surface disinfection schedules. Twice daily—perhaps during morning and evening vital sign checks—disinfect all high-touch surfaces in the isolation room. This includes doorknobs (both sides), light switches, bedside table surfaces, phone or tablet screens, toilet handle, sink faucets, and any other surfaces the sick person touches regularly. Use EPA-registered disinfectant and follow the contact time listed on the label—most require surfaces to remain wet for 3-10 minutes to effectively kill pathogens.
The bathroom deserves special attention because it's a high-contamination zone. After each use, the sick person should wipe down surfaces they touched. Your daily deep clean should include the toilet (entire surface, not just the bowl), sink, faucet handles, door handle, and light switch. If the sick person is strong enough, they can perform much of this cleaning themselves, reducing your exposure while giving them a sense of contribution.
Step 5: Coordinate meal delivery and medication administration. Establish a regular meal schedule and stick to it—routine provides psychological comfort during the stress of illness. Prepare meals in disposable containers when possible, or designate specific dishes that will be used only by the sick person and washed separately. Place the meal on the staging table outside the door, knock, and step back. The sick person opens the door, retrieves the meal, and later places empty containers in the dirty zone for your removal.
If you're administering medications, organize them in a daily pill organizer to minimize the number of times you must enter the room. Leave a full day's doses during your morning check. Ensure adequate water is available—a large pitcher refilled daily reduces the need for multiple beverage deliveries.
Step 6: Manage laundry with contamination control. Soiled linens and clothing require careful handling. The sick person should place items in a dedicated laundry bag inside the isolation room. When the bag is full, they tie it closed and place it in the dirty zone. Wearing gloves, you transport the bag directly to the washing machine without opening it or setting it down anywhere. Open the bag directly over the washer and dump contents in without sorting. Wash in the hottest water safe for the fabric with regular detergent and a laundry sanitizer if available. Dry on high heat, which provides additional pathogen kill.
Wash your hands after handling contaminated laundry, even though you wore gloves. Clean and disinfect the laundry bag before returning it to the isolation room, or use disposable bags if preferred.
Step 7: Maintain communication and psychological support. Isolation takes an emotional toll that can undermine physical recovery. Schedule regular video calls—perhaps during meals so you can "eat together" while separated. Ask open-ended questions about how they're feeling, both physically and emotionally. Loneliness and anxiety can affect recovery, so psychological support isn't just kindness—it's part of the medical protocol.
Watch for signs of depression or severe anxiety: loss of appetite beyond what the illness explains, excessive sleep, expressions of hopelessness, or panic attacks. These warrant consultation with a mental health provider, many of whom offer telehealth services. The isolation period is temporary, but the experience can leave lasting psychological impacts if not addressed proactively.
Step 8: Plan for emergency escalation. Despite your best home care efforts, some situations require professional medical intervention. Keep a hospital bag packed with insurance cards, identification, current medication list, and your symptom log. Know the fastest route to your nearest emergency room. Establish clear criteria for when you'll call 911: severe breathing difficulty, chest pain, confusion or inability to wake, bluish lips or face, or other symptoms specific to the illness being treated.
When you call for emergency help, immediately inform dispatch that the patient has been in isolation for a contagious disease. This allows responders to arrive with appropriate PPE and prevents exposing them unnecessarily. Your detailed symptom log becomes invaluable in these moments, providing emergency physicians with a clear picture of disease progression.
Pros and Cons of Home Quarantine
Home quarantine offers significant advantages but also presents real challenges. Understanding both helps you make informed decisions about whether home isolation is appropriate for your situation.
Advantages of Home Quarantine:
Familiar environment supports recovery. Being in your own home reduces stress compared to hospital settings. Familiar surroundings, personal belongings, and the comfort of home can positively impact psychological wellbeing during illness. You control the environment—room temperature, lighting, noise levels—in ways impossible in institutional settings.
Cost-effectiveness compared to hospitalization. For illnesses that don't require intensive medical intervention, home quarantine eliminates hospital bills, which can reach thousands of dollars even for short stays. You avoid facility fees, daily room charges, and the cascade of costs associated with institutional care.
Reduced exposure to other pathogens. Hospitals and medical facilities, despite rigorous cleaning protocols, harbor various pathogens. Home isolation eliminates the risk of acquiring additional infections during recovery from your primary illness.
Family proximity (with appropriate precautions). While physical separation is necessary, being in the same building allows for easier communication and monitoring compared to hospital visitation restrictions. Family members can provide care, emotional support, and advocacy in ways that institutional settings don't always accommodate.
Flexibility in care approaches. You control meal timing, sleep schedules, and daily routines. Want to sleep until noon because you were up coughing all night? No one's waking you for 6 AM vital signs. Prefer specific comfort foods? Your kitchen is steps away.
Disadvantages of Home Quarantine:
Limited medical monitoring and intervention. Home settings lack the continuous monitoring, immediate access to emergency interventions, and specialized equipment available in hospitals. If your condition deteriorates rapidly, the delay in getting to professional care could be dangerous.
Burden on family caregivers. Home quarantine places significant physical and emotional demands on household members. Caregivers must learn unfamiliar protocols, maintain vigilance over extended periods, and manage their own anxiety about infection risk while providing care.
Contamination risk to household members. Despite best practices, home isolation carries inherent transmission risk. Shared HVAC systems, imperfect adherence to protocols, and the simple reality of living in close quarters mean household members face exposure that wouldn't exist if the sick person were hospitalized.
Space and resource requirements. Not all homes have suitable isolation rooms with dedicated bathrooms. Smaller living spaces, shared bedrooms, or single-bathroom homes make effective isolation extremely difficult. The necessary supplies also represent a financial investment that some households struggle to afford.
Psychological strain of isolation. Extended isolation in a single room can trigger or worsen depression, anxiety, and feelings of disconnection. For some individuals, particularly those living alone or with pre-existing mental health conditions, the psychological costs may outweigh the benefits of home quarantine.
Inadequate for severe cases. Home quarantine is appropriate only for mild to moderate illness. Severe respiratory distress, high fevers unresponsive to medication, dehydration, or complications require hospital-level care. Attempting home quarantine in these situations delays necessary treatment and can be life-threatening.
The decision to pursue home quarantine versus seeking institutional care depends on illness severity, household resources, available space, and the capability of family members to provide appropriate care. Consult with healthcare providers to determine whether your specific situation is suitable for home isolation.
When to Seek Professional Medical Care
Home quarantine works for many situations, but recognizing when professional intervention becomes necessary can be life-saving. Don't let commitment to home isolation delay critical care.
Immediate emergency care (call 911):
- Severe difficulty breathing or shortness of breath at rest
- Persistent chest pain or pressure
- New confusion or inability to wake/stay awake
- Bluish lips, face, or nail beds
- Inability to keep down fluids for 12+ hours with signs of dehydration
- Seizures
- Severe, persistent dizziness or lightheadedness
Urgent medical consultation (same-day telehealth or clinic visit):
- Fever above 103°F that doesn't respond to medication
- Oxygen saturation consistently below 94% (if you have a pulse oximeter)
- Worsening symptoms after initial improvement
- Difficulty breathing that's getting progressively worse
- Severe sore throat preventing swallowing
- Signs of secondary infection (new fever after initial recovery, colored mucus changing to different color, new pain)
Routine medical follow-up (within 24-48 hours):
- Symptoms persisting beyond expected duration for the illness
- Mild worsening of symptoms
- Questions about medication effectiveness
- Concerns about recovery progress
- Need for work/school clearance documentation
Trust your instincts. If something feels seriously wrong, seek medical evaluation even if symptoms don't perfectly match these criteria. Healthcare providers would rather assess you and send you home than have you delay care for a deteriorating condition.
The daily grind of quarantine protocols tests your patience and discipline, but every careful procedure contributes to keeping your household healthy. The difference between successful home isolation and household-wide infection often comes down to maintaining these protocols when you're tired, stressed, and eager for the ordeal to end. Stay systematic, stay vigilant, and trust that your careful attention to detail is protecting everyone under your roof.