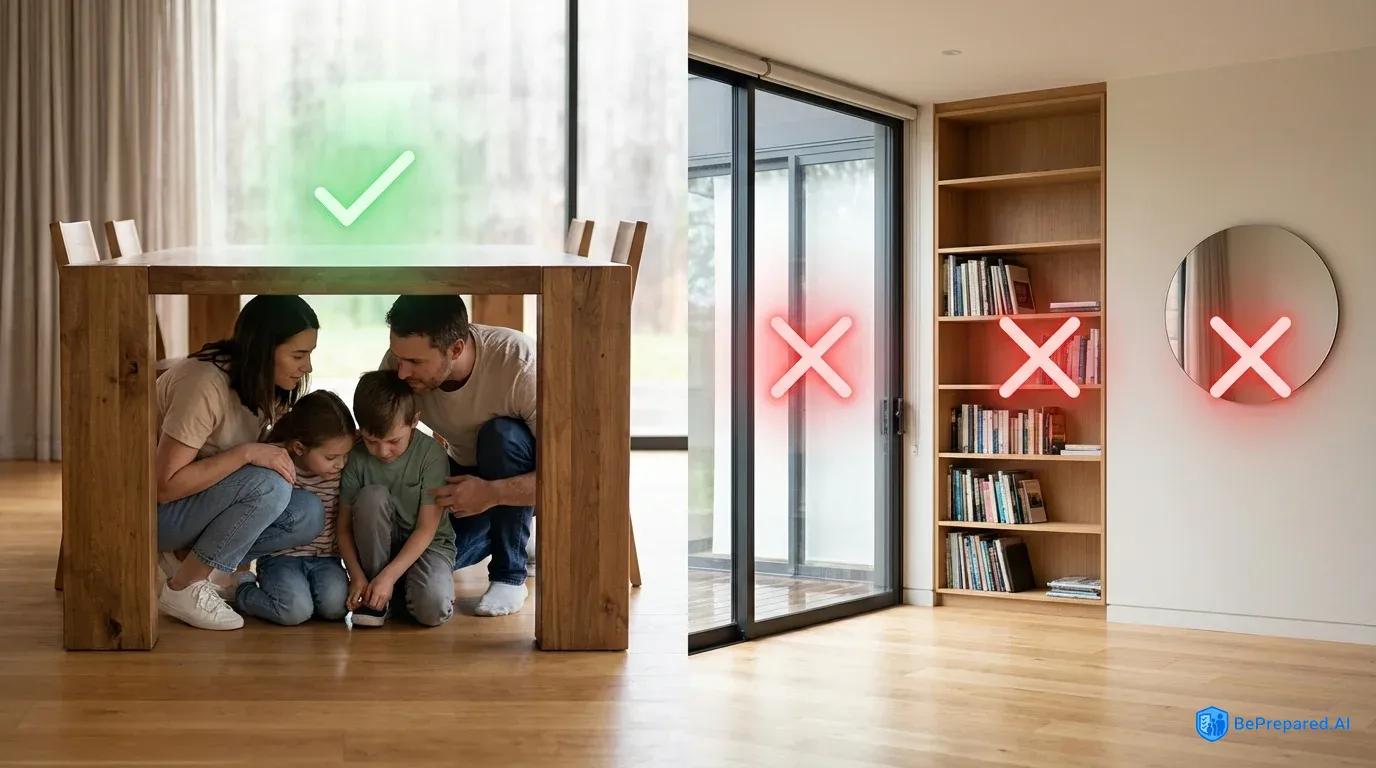
Understanding Earthquake Safety Zones in Your Home
The short answer: The safest places in your home during an earthquake are under a sturdy table or desk, or against an interior wall away from windows — dropped to your hands and knees, covering your head and neck, and holding on until the shaking stops. If you are in bed, stay there, turn face down, and cover your head and neck with a pillow. Doorways are NOT safe in modern homes, and running outside during shaking is one of the most common ways people get hurt (Ready.gov).
The 10 safest spots at a glance (each explained room by room below):
- Under a sturdy dining table
- Under a solid desk
- In your bed — face down, pillow over your head and neck — if it sits clear of windows and heavy furniture
- Under a sturdy, solid-wood coffee table
- An interior wall corner in the living room, away from windows
- Against an interior hallway wall
- The center of the kitchen, away from cabinets and appliances — under the kitchen table if you have one
- Crouched beside the bathtub, arms covering your head and neck
- Braced in an interior doorframe — ONLY as a last resort in a small bathroom with no better option
- Wherever you are when the shaking starts: drop, cover, and hold on. The best spot is almost always the safe cover you can reach in two seconds, not the perfect one across the room.
Want the full picture beyond safe spots — kits, drills, and what to do after the shaking stops? Our earthquake preparedness guide covers the complete timeline, and a personalized household plan turns it into steps assigned to your family.
The ground starts shaking at 2 AM. You jolt awake, heart pounding, as your bedroom furniture rattles and picture frames swing on the walls. In those crucial seconds, where do you go? The doorway? Under a table? Outside? If you're unsure, you're not alone—and that uncertainty doesn't have to continue.
Here's the good news: knowing exactly where to take cover in your home can dramatically increase your safety during an earthquake. But much of what people believe about earthquake safety is outdated or simply wrong. Let's clear up the confusion and help you identify the truly safe spots in every room of your house. You'll discover this is simpler than you might think.
The fundamental principle of earthquake safety zones comes down to protection from two main threats: falling objects and collapsing structures. Interior locations consistently outperform exterior spots because exterior walls bear more structural stress during ground movement and often contain windows that can shatter . Think of your home's interior as the sturdy core of an apple—it's the most protected part of the structure.
One of the biggest misconceptions? That doorways are the safest place to be. This outdated advice came from old adobe houses where doorframes were actually the strongest part of the structure. In modern construction, doorways offer no special protection and actually put you at risk of the door swinging violently and causing injury . Running outside during shaking is equally dangerous—most earthquake injuries happen when people try to move to a different location rather than immediately taking cover where they are.
The safest approach follows the "Drop, Cover, and Hold On" method under sturdy furniture or against interior walls, away from windows, mirrors, and anything that could fall . Understanding this basic framework transforms every room in your home from a space of uncertainty into a place where you know exactly what to do when the shaking starts. You're building a mental map that becomes automatic with just a little practice.
Bedroom Safety Spots
Your bedroom deserves special attention because earthquakes don't follow a schedule—many strike while you're sleeping. The good news is that your bed itself might be one of the safest places to be, depending on what's around it. Let's walk through how to make your bedroom earthquake-ready without turning it into a bunker.
Bedroom Safety Checklist:
-
Stay in bed if it's sturdy and positioned safely. If your bed has a solid frame and you're away from windows and heavy furniture that could topple, simply cover your head and neck with a pillow and stay put . Moving in the dark while the ground shakes increases injury risk. This is often the easiest option and requires zero effort when you're groggy at 2 AM.
-
Maintain at least a 10-foot buffer from all windows. Glass becomes dangerous projectiles during earthquakes . Measure the distance from your bed to any windows—if it's less than 10 feet, consider rearranging your furniture. This single change can make a huge difference in your safety.
-
Clear the path from your bed to your primary safe spot. If staying in bed isn't safe due to overhead lighting fixtures or nearby bookcases, identify where you'll drop and cover—then make sure you won't trip over shoes, laundry, or other obstacles getting there in the dark. A clear path takes five minutes to create and could prevent a twisted ankle or worse.
-
Secure or remove items above your bed. That decorative mirror or heavy picture frame hanging over your headboard? It needs to come down or be properly secured with earthquake-safe hangers. The same goes for shelving units near the bed. You don't need to strip your room bare—just move heavy items to walls that don't border your sleeping space.
-
Keep a flashlight and shoes within arm's reach. A headlamp or flashlight on your nightstand helps you navigate safely after shaking stops . Sturdy shoes protect your feet from broken glass during evacuation. Keep these items in the same spot always so you can find them without thinking.
Consider doing a simple bedroom audit this weekend. Lie in bed and look up and around. What could fall on you? What could shatter? These observations guide your furniture arrangement and help you identify the safest spot for nighttime earthquakes. You're not looking for perfection—you're looking for improvement.
Living Areas and Common Spaces
Your living room, family room, and other common spaces present both opportunities and challenges for earthquake safety. These spaces typically contain the sturdiest furniture in your home, but they also often feature large windows, heavy entertainment centers, and decorative items that become hazards during shaking. Let's break this down into manageable steps.
Step 1: Identify Your Sturdiest Furniture
Walk through your living spaces and evaluate each piece of furniture as potential earthquake shelter. Solid wood tables, heavy desks, and sturdy coffee tables can provide good protection from falling debris . Run your hands along the underside—does it feel substantial? Could it support weight if something fell on it? Look for furniture that doesn't wobble when you shake it gently.
That beautiful glass coffee table might be a design statement, but it won't help during an earthquake and actually creates additional hazards when it shatters. Particleboard furniture may also collapse under pressure. You're looking for pieces that feel heavy and solid when you test them.
Step 2: Locate Interior Wall Corners
Interior wall corners—especially those formed by two load-bearing walls—create natural safety pockets. These spots benefit from structural support on two sides and typically sit farther from windows. Corner spots reduce your exposure to falling debris because you're protected on multiple sides rather than exposed in the middle of a room . Stand in various corners of your living space. Can you crouch down comfortably? Is the corner clear of tall furniture that could topple onto you?
Step 3: Map Hazardous Features
Now identify what to avoid. Large windows, sliding glass doors, mirrors, and mounted televisions all pose serious risks. Bookcases, china cabinets, and entertainment centers can topple forward. Ceiling fans and light fixtures may fall. Fireplaces and chimneys—particularly on exterior walls—are prone to collapse . Make mental notes of these danger zones. You're not trying to memorize everything—just notice the obvious hazards.
Step 4: Choose Your Primary and Backup Safe Spots
Based on your furniture assessment and hazard mapping, select your go-to safe spot in each common area. Maybe it's under the solid oak dining table, away from the bay window. Your backup might be the interior corner by the hallway, clear of the bookshelf. Physically practice getting to these spots. Time yourself. Notice what's in your path.
The key is making these decisions now, while the ground is still, so your body knows exactly where to go when your brain is flooded with adrenaline and everything is shaking. This preparation takes the guesswork out of a scary situation.
Kitchen and Bathroom Safety
Kitchens and bathrooms present unique challenges during earthquakes. These rooms contain hard surfaces, heavy appliances, breakable fixtures, and—in the case of kitchens—numerous items that can become airborne projectiles. Understanding these specific risks helps you make smarter decisions about where to take cover. The good news? You probably don't spend as much time in these rooms, so your exposure is naturally lower.
Kitchen Safety Checklist:
-
Move away from appliances if you can do so quickly. Refrigerators, stoves, and dishwashers can shift or tip during strong shaking. They may also break free from their connections, potentially causing gas leaks or water damage . If you're cooking when shaking starts, don't try to turn off the stove—just drop, cover, and hold on immediately. Your safety comes before preventing a mess.
-
Stay clear of upper cabinets. Even with safety latches, cabinet doors can fly open and dump their contents. Heavy dishes, canned goods, and small appliances become dangerous when they fall from height. The center of the kitchen, away from cabinets, offers more protection than areas directly beneath them. This is one reason why getting under the kitchen table (if you have one) makes sense.
-
Identify your kitchen safe spot in advance. If your kitchen has a sturdy table or island with solid construction, get underneath it. Otherwise, your safest move might be to quickly exit the kitchen for a safer room if you have a second or two before major shaking begins. Don't overthink this—if shaking starts strong and fast, drop where you are.
Bathroom Safety Checklist:
-
Understand that bathroom fixtures can break. Toilets can crack, sinks can separate from walls, mirrors shatter, and medicine cabinets spill their contents . That porcelain and glass creates sharp hazards. Knowing this helps you understand why bathrooms aren't ideal shelter spots.
-
Use the doorframe only as a last resort. If caught in a small bathroom with no other options, bracing yourself in the doorframe to an interior hallway is acceptable, but it's not ideal due to the swinging door risk mentioned earlier . You're better off crouching next to the toilet or tub, covering your head and neck with your arms.
-
Consider the bathtub carefully. Old advice suggested getting in the bathtub, but this only makes sense if you can cover yourself with something sturdy like a thick board or mattress. An empty bathtub offers no overhead protection from falling debris.
The reality is that kitchens and bathrooms are often challenging places to be during an earthquake. If you're in these rooms when shaking starts, take cover immediately under whatever protection exists. When planning your home's safety zones, prioritize other rooms for your primary safe spots. This doesn't mean you're unsafe in these rooms—just that you have better options elsewhere.
Creating Your Quick-Reference Safety Plan
Knowledge without a plan is just interesting information. Transforming what you've learned into a practical, family-wide safety system is what actually protects lives when the ground starts moving. Let's build your personalized earthquake safety plan step by step. This sounds complicated, but you can complete the basics in about 30 minutes.
Step 1: Draw Your Room-by-Room Safety Map
Get a piece of paper or open a document on your computer. Sketch a simple floor plan of your home—it doesn't need to be architectural quality, just functional. In each room, mark your primary safe spot with a star and your backup spot with a circle. Use a different color to mark hazard zones: windows, heavy furniture that could topple, fireplaces, and exterior walls. This visual reference helps everyone in your household understand the safety geography of your home at a glance .
Post this map on your refrigerator or somewhere everyone sees it daily. When family members walk past it regularly, the information sinks in naturally without formal study sessions. You're making safety information visible and accessible.
Step 2: Establish Your Family Communication Plan
Earthquakes separate families. Someone might be at work, school, or running errands when it hits. Designate an out-of-state contact person that everyone can check in with—local phone lines often fail, but long-distance calls sometimes get through . Write down this contact's phone number and make sure every family member has it in their phone and on a card in their wallet.
Identify your reunion location if you can't return home. Maybe it's a relative's house across town or a specific park. Having a plan eliminates the panic of not knowing where your loved ones are or how to find them. This simple step brings tremendous peace of mind.
Step 3: Practice Your Drop, Cover, and Hold On Drills
Here's where many families stop, and it's a missed opportunity. Practice helps your body respond automatically during actual earthquakes . Schedule a drill once every three months. Don't announce it—just shout "Earthquake!" and have everyone practice getting to their safe spots. Time yourselves. Notice what doesn't work. Did someone trip? Is furniture blocking the path? Adjust accordingly.
Make drills realistic by practicing at different times: during dinner, while watching TV, during the night. Each scenario reveals different challenges. Your kids might giggle the first few times, but the muscle memory you're building could protect them when it matters. Think of it like a fire drill—a little awkward, but valuable.
Step 4: Review and Update Quarterly
Your home changes. You buy new furniture, rearrange rooms, or add decorations. Set a recurring calendar reminder to review your safety plan every three months. Walk through each room again. Are the safe spots still valid? Have new hazards appeared? Update your map and practice your drills.
This quarterly check-in takes about 15 minutes and keeps your plan current. You're not starting from scratch each time—just making small adjustments as your home evolves. Pair it with another regular task like changing air filters or checking smoke detector batteries so you remember to do it.
The difference between families who handle earthquakes well and those who suffer preventable injuries often comes down to this simple truth: they had a plan, they practiced it, and everyone knew exactly what to do when the shaking started. Your plan doesn't need to be perfect—it just needs to exist and be practiced.
Start with one room today. Maybe just your bedroom. Identify the safe spot, clear the path, and you're already ahead of most people. Tomorrow, tackle the living room. By the end of the week, you'll have a complete plan without ever feeling overwhelmed. Small steps add up to real preparedness, and you're already on your way.
Keep going: from safe spots to a full plan
Knowing where to shelter is step one. The earthquake preparedness guide walks the full before-during-after timeline, including the supplies worth staging near your safe spots. And because every household is different — kids, pets, mobility needs, a second-floor bedroom — a BeReady household plan sequences the work for your actual family, not a generic one.